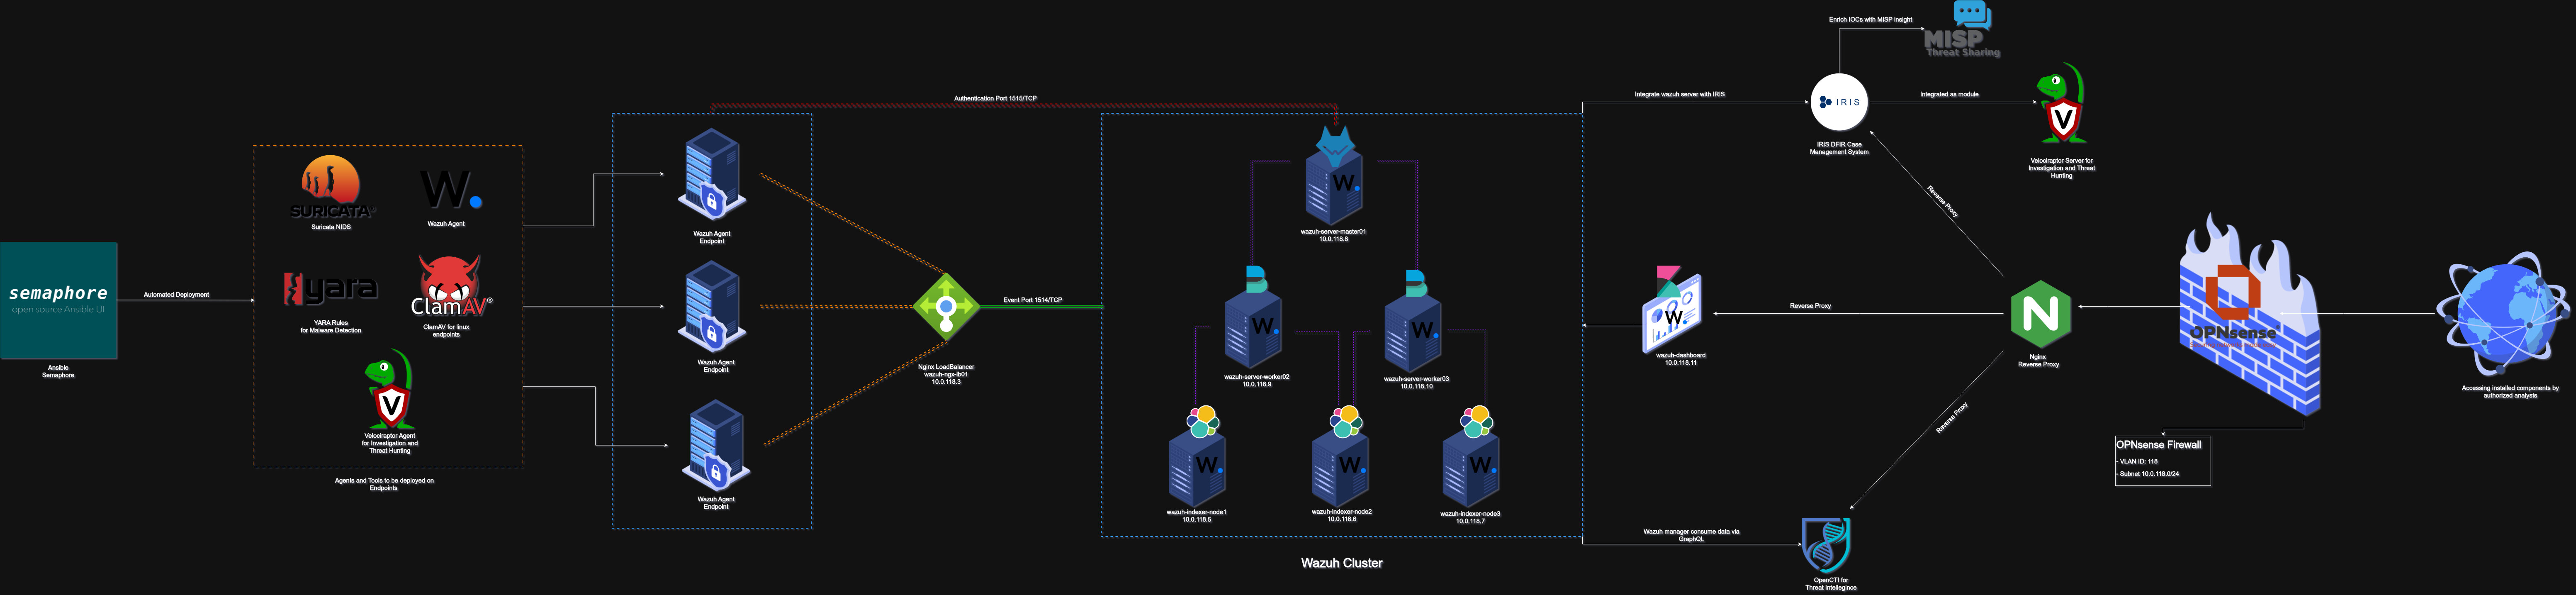
This blog post will be about deploying a distributed installation of Wazuh as a free SIEM solution that can be deployed in production environment, Extended with a multiple components that will help the analyst to have more visibility and not to be overwhelmed as possible to deal with the alerts and cases as possible.
I have created before a test environment “All in one” installation using docker and docker-compose for automated installation to be like a test environment, Check it out https://github.com/r0ttenbeef/SIEMPack
Also, I tried to do the same but this time instead of Wazuh I’ve used Elastic Security inside docker and docker-compose for automated deployment, extended with multiple components. You can check it out here https://github.com/r0ttenbeef/SocGate
In this installation I will do a distributed installation using ProxMox seprated VMs inside my home server.
Network Subnet
I will use OPNsense firewall, Which is an opensource firewall forked of PfSense but it has evolved rapidly with a strong focus on security and quality.
- Subnet: 10.0.118.0/24
- VLAN: 118

Operating System
In this installation I will use Ubuntu server Noble cloud image configured as CloudInit template, Please follow this blogpost about how to Create CloudInit Ubuntu Image in Proxmox. This will make our life easier and we will not have to reinstall Ubuntu server each time we want to create a VM.
Nginx Reverse Proxy Installation
In this step will install Nginx as a reverse proxy for our components that required a web UI access using an internal domain
Nginx reverse proxy virtual machine specs.
| Hostname | RAM | CPU | Disk | IP Address |
|---|---|---|---|---|
| nginx-main-proxy | 4 GB | 4 Cores | 30 GB | 10.0.118.4 |
- Install Nginx on ubuntu server VM.
apt install nginx - Enable and start Nginx service.
systemctl enable nginx
systemctl start nginx
Nginx Load Balancer Installation
It’s the same steps for Nginx installation but this server will be used as a load balancer between Wazuh agents among the different worker nodes in a Wazuh server cluster.
Nginx load balancer virtual machine specs.
| Hostname | RAM | CPU | Disk | IP Address |
|---|---|---|---|---|
| wazuh-ngx-lb01 | 4 GB | 4 Cores | 30 GB | 10.0.118.3 |
It’s recommended to increase these specs in the future when you have more agents deployed and create multiple load balancer nodes.
- Install the following packages
sudo apt install nginx libnginx-mod-stream
Wazuh Cluster Installation Requirements
Wazuh have a great detailed documentation that you must check here https://documentation.wazuh.com/ for both all-in-one installation and distributed installation.
I will write the installation method that I will use in this setup to be used a to-the-point reference.
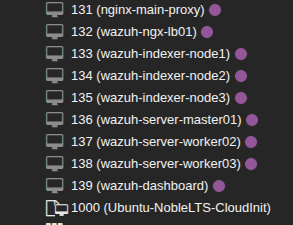
Wazuh Cluster Specs.
| Wazuh Nodes | Hostname | RAM | CPU | Disk | IP Address |
|---|---|---|---|---|---|
| Wazuh Indexer | wazuh-indexer-node1 | 2 GB | 4 Cores | 50 GB | 10.0.118.5 |
| Wazuh Indexer | wazuh-indexer-node2 | 2 GB | 4 Cores | 50 GB | 10.0.118.6 |
| Wazuh Indexer | wazuh-indexer-node3 | 2 GB | 4 Cores | 50 GB | 10.0.118.7 |
| Wazuh Server | wazuh-server-master01 | 4 GB | 4 Cores | 50 GB | 10.0.118.8 |
| Wazuh Server | wazuh-server-worker02 | 4 GB | 4 Cores | 50 GB | 10.0.118.9 |
| Wazuh Server | wazuh-server-worker03 | 4 GB | 4 Cores | 50 GB | 10.0.118.10 |
| Wazuh Dashboard | wazuh-dashboard | 4 GB | 4 Cores | 50 GB | 10.0.118.11 |
Also, I have created an Alias on the firewall that have all of the IPs of our wazuh cluster to allow these IPs for internet access.  I have created ssh config file to easy communicate with server using hostname and ssh key.
## Wazuh Cluster
Host nginx-main-proxy
    Hostname 10.0.118.4
    User luser
    IdentityFile ~/.ssh/wazuh-cluster.key

Host wazuh-ngx-lb01
    Hostname 10.0.118.3
    User luser
    IdentityFile ~/.ssh/wazuh-cluster.key

Host wazuh-indexer-node1
    Hostname 10.0.118.5
    User luser
    IdentityFile ~/.ssh/wazuh-cluster.key

Host wazuh-indexer-node2
    Hostname 10.0.118.6
    User luser
    IdentityFile ~/.ssh/wazuh-cluster.key

Host wazuh-indexer-node3
    Hostname 10.0.118.7
    User luser
    IdentityFile ~/.ssh/wazuh-cluster.key

Host wazuh-server-master01
    Hostname 10.0.118.8
    User luser
    IdentityFile ~/.ssh/wazuh-cluster.key

Host wazuh-server-worker02
    Hostname 10.0.118.9
    User luser
    IdentityFile ~/.ssh/wazuh-cluster.key

Host wazuh-server-worker03
    Hostname 10.0.118.10
    User luser
    IdentityFile ~/.ssh/wazuh-cluster.key

Host wazuh-dashboard
    Hostname 10.0.118.11
    User luser
    IdentityFile ~/.ssh/wazuh-cluster.key
Create Wazuh Certificates
- Download certificate creation tools on your machine with the following commands.
wget -c https://packages.wazuh.com/4.12/wazuh-certs-tool.sh wget -c https://packages.wazuh.com/4.12/config.yml - Edit
config.ymland add the node names and IP values.
nodes:
  # Wazuh indexer nodes
  indexer:
    - name: wazuh-indexer-node1
      ip: "10.0.118.5"
    - name: wazuh-indexer-node2
      ip: "10.0.118.6"
    - name: wazuh-indexer-node3
      ip: "10.0.118.7"

  # Wazuh server nodes
  server:
    - name: wazuh-server-master01
      ip: "10.0.118.8"
      node_type: master
    - name: wazuh-server-worker02
      ip: "10.0.118.9"
      node_type: worker
    - name: wazuh-server-worker03
      ip: "10.0.118.10"
      node_type: worker

  # Wazuh dashboard nodes
  dashboard:
    - name: wazuh-dashboard
      ip: "10.0.118.11"
- Run certificate tool script to create certificates
bash ./wazuh-certs-tool.sh -A - Compress all certificates
tar -cvf ./wazuh-certificates.tar -C ./wazuh-certificates/ . rm -rf ./wazuh-certificates - Transfer
wazuh-certificates.tarfile to all nodes “Wazuh Indexer, Wazuh Server and Wazuh Dashboard”. I have usedscputility.for host in wazuh-indexer-node1 wazuh-indexer-node2 wazuh-indexer-node3 wazuh-server-master01 wazuh-server-worker02 wazuh-server-worker03 wazuh-dashboard; do scp wazuh-certificates.tar $host:~/;done

Wazuh Indexer Nodes Installation
This will be applied on all of the wazuh-indexer nodes servers.
- Install required packages
sudo apt install debconf adduser procps - Add Wazuh repository
sudo apt install gnupg apt-transport-https

curl -s https://packages.wazuh.com/key/GPG-KEY-WAZUH | sudo gpg --no-default-keyring --keyring gnupg-ring:/usr/share/keyrings/wazuh.gpg --import && sudo chmod 644 /usr/share/keyrings/wazuh.gpg

echo "deb [signed-by=/usr/share/keyrings/wazuh.gpg] https://packages.wazuh.com/4.x/apt/ stable main" | sudo tee -a /etc/apt/sources.list.d/wazuh.list

sudo apt update
- Install Wazuh indexer
sudo apt install wazuh-indexer
Wazuh Indexer Cluster Initialization
- Configure Wazuh indexer at
/etc/wazuh-indexer/opensearch.yml- NOTICE: On each wazuh indexer node change the
node.nameas it configured earlier onconfig.ymlfile.
- NOTICE: On each wazuh indexer node change the
network.host:

node.name: wazuh-indexer-node1 # Change in the other nodes

cluster.initial_master_nodes:
- "wazuh-indexer-node1"
- "wazuh-indexer-node2"
- "wazuh-indexer-node3"

discovery.seed_hosts:
- "10.0.118.5"
- "10.0.118.6"
- "10.0.118.7"

plugins.security.nodes_dn:
- "CN=wazuh-indexer-node1,OU=Wazuh,O=Wazuh,L=California,C=US"
- "CN=wazuh-indexer-node2,OU=Wazuh,O=Wazuh,L=California,C=US"
- "CN=wazuh-indexer-node3,OU=Wazuh,O=Wazuh,L=California,C=US"
- Deploy the certificates using the compressed certificates transferred earlier to the nodes
- NOTICE: On each wazuh indexer node change the variable
NODE_NAMEas it configured earlier onconfig.ymlfile.
- NOTICE: On each wazuh indexer node change the variable
NODE_NAME=wazuh-indexer-node1
mkdir /etc/wazuh-indexer/certs
tar -xf ./wazuh-certificates.tar -C /etc/wazuh-indexer/certs/ ./$NODE_NAME.pem ./$NODE_NAME-key.pem ./admin.pem ./admin-key.pem ./root-ca.pem
mv -n /etc/wazuh-indexer/certs/$NODE_NAME.pem /etc/wazuh-indexer/certs/indexer.pem
mv -n /etc/wazuh-indexer/certs/$NODE_NAME-key.pem /etc/wazuh-indexer/certs/indexer-key.pem
chmod 500 /etc/wazuh-indexer/certs
chmod 400 /etc/wazuh-indexer/certs/*
chown -R wazuh-indexer:wazuh-indexer /etc/wazuh-indexer/certs
- Delete the certificate compressed file.
rm -f ./wazuh-certificates.tar - Start the indexer service.
systemctl daemon-reload
systemctl enable wazuh-indexer
systemctl start wazuh-indexer
- Initialize the indexer cluster on any indexer node, You don’t have to run this on all indexer nodes just run it once on any indexer node, I highly recommend to run it on the first node “wazuh-indexer-node1” for example.
/usr/share/wazuh-indexer/bin/indexer-security-init.sh - Now test the cluster installation.
curl -k -u admin:admin https://10.0.118.5:9200
curl -k -u admin:admin https://10.0.118.6:9200
curl -k -u admin:admin https://10.0.118.7:9200

## Output
{
      "name" : "wazuh-indexer-node1",
      "cluster_name" : "wazuh-cluster",
      "cluster_uuid" : "095jEW-oRJSFKLz5wmo5PA",
      "version" : {
        "number" : "7.10.2",
        "build_type" : "rpm",
        "build_hash" : "db90a415ff2fd428b4f7b3f800a51dc229287cb4",
        "build_date" : "2023-06-03T06:24:25.112415503Z",
        "build_snapshot" : false,
        "lucene_version" : "9.6.0",
        "minimum_wire_compatibility_version" : "7.10.0",
        "minimum_index_compatibility_version" : "7.0.0"
      },
      "tagline" : "The OpenSearch Project: https://opensearch.org/"
}
- Check if the nodes is working correctly.
curl -k -u admin:admin https://10.0.118.5:9200/_cat/nodes?v
Wazuh Server Master and Worker Nodes Installation
The following installation steps will be applied on all wazuh server master and worker nodes.
- Add Wazuh repositories.
apt install gnupg apt-transport-https

curl -s https://packages.wazuh.com/key/GPG-KEY-WAZUH | gpg --no-default-keyring --keyring gnupg-ring:/usr/share/keyrings/wazuh.gpg --import && chmod 644 /usr/share/keyrings/wazuh.gpg

echo "deb [signed-by=/usr/share/keyrings/wazuh.gpg] https://packages.wazuh.com/4.x/apt/ stable main" | tee -a /etc/apt/sources.list.d/wazuh.list

apt update
- Install Wazuh manager package.
apt install wazuh-manager
- Install Filebeat.
apt install filebeat - Download the preconfigured filebeat configuration file.
curl -so /etc/filebeat/filebeat.yml https://packages.wazuh.com/4.12/tpl/wazuh/filebeat/filebeat.yml - Edit the
/etc/filebeat/filebeat.ymlfile with the following values- In hosts add the Wazuh indexer nodes IP Addresses.
# Wazuh - Filebeat configuration file
 output.elasticsearch:
 hosts: ["10.0.118.5:9200", "10.0.118.6:9200", "10.0.118.7:9200"]
 protocol: https
 username: ${username}
 password: ${password}
- In hosts add the Wazuh indexer nodes IP Addresses.
- Create a Filebeat keystore to securely store authentication credentials.
filebeat keystore create - Add the default username and password
admin:adminto the secrets keystore.echo admin | filebeat keystore add username --stdin --force echo admin | filebeat keystore add password --stdin --force - Download the alerts template for the Wazuh indexer.
curl -so /etc/filebeat/wazuh-template.json https://raw.githubusercontent.com/wazuh/wazuh/v4.12.0/extensions/elasticsearch/7.x/wazuh-template.json chmod go+r /etc/filebeat/wazuh-template.json - Install the Wazuh module for Filebeat.
curl -s https://packages.wazuh.com/4.x/filebeat/wazuh-filebeat-0.4.tar.gz | tar -xvz -C /usr/share/filebeat/module - Deploy the certificates using the compressed certificates transferred earlier to the nodes
- NOTICE: On each wazuh server node change the variable
NODE_NAMEas it configured earlier onconfig.ymlfile.NODE_NAME=wazuh-server-master01 mkdir /etc/filebeat/certs tar -xf ./wazuh-certificates.tar -C /etc/filebeat/certs/ ./$NODE_NAME.pem ./$NODE_NAME-key.pem ./root-ca.pem mv -n /etc/filebeat/certs/$NODE_NAME.pem /etc/filebeat/certs/filebeat.pem mv -n /etc/filebeat/certs/$NODE_NAME-key.pem /etc/filebeat/certs/filebeat-key.pem chmod 500 /etc/filebeat/certs chmod 400 /etc/filebeat/certs/* chown -R root:root /etc/filebeat/certs
- NOTICE: On each wazuh server node change the variable
Wazuh Server Manager Cluster Initialization
- Generate random key to encrypt communication between cluster nodes, This will be the same for all of the nodes in the cluster. It’s recommended to generated it on master node to not get confused.
openssl rand -hex 16 - Configure the Wazuh server master node in
/var/ossec/etc/ossec.confconfiguration file on the wazuh-server-master01 server.
<cluster>
  <name>wazuh-manager-cl</name>
  <node_name>wazuh-server-master01</node_name>
  <node_type>master</node_type>
  <key>!!PUT KEY GENERATED ON MASTER NODE!!</key>
  <port>1516</port>
  <bind_addr>0.0.0.0</bind_addr>
  <nodes>
    <node>10.0.118.8</node> <!-- Master node ip -->
  </nodes>
  <hidden>no</hidden>
  <disabled>no</disabled>
</cluster>
- Configure the Wazuh server worker node in
/var/ossec/etc/ossec.confconfiguration file on the wazuh-server-worker02 server.
<cluster>
    <name>wazuh-manager-cl</name>
    <node_name>wazuh-server-worker02</node_name>
    <node_type>worker</node_type>
    <key>!!PUT KEY GENERATED ON MASTER NODE!!</key>
    <port>1516</port>
    <bind_addr>0.0.0.0</bind_addr>
    <nodes>
        <node>10.0.118.8</node> <!-- Master node ip -->
    </nodes>
    <hidden>no</hidden>
    <disabled>no</disabled>
</cluster>
- Configure the Wazuh server worker node in
/var/ossec/etc/ossec.confconfiguration file on the wazuh-server-worker03 server.
<cluster>
    <name>wazuh-manager-cl</name>
    <node_name>wazuh-server-worker03</node_name>
    <node_type>worker</node_type>
    <key>!!PUT KEY GENERATED ON MASTER NODE!!</key>
    <port>1516</port>
    <bind_addr>0.0.0.0</bind_addr>
    <nodes>
        <node>10.0.118.8</node> <!-- Master node ip -->
    </nodes>
    <hidden>no</hidden>
    <disabled>no</disabled>
</cluster>
Configure Wazuh indexer connection
Configure the connection between wazuh server cluster and wazuh indexer cluster on all Wazuh server nodes.
- Save the Wazuh indexer username and password into the Wazuh manager keystore using the wazuh-keystore tool
echo admin | /var/ossec/bin/wazuh-keystore -f indexer -k username
echo admin | /var/ossec/bin/wazuh-keystore -f indexer -k password
- Edit
/var/ossec/etc/ossec.confto configure the indexer connection.
<indexer>
  <enabled>yes</enabled>
  <hosts>
    <host>https://10.0.118.5:9200</host>
    <host>https://10.0.118.6:9200</host>
    <host>https://10.0.118.7:9200</host>
  </hosts>
  <ssl>
    <certificate_authorities>
      <ca>/etc/filebeat/certs/root-ca.pem</ca>
    </certificate_authorities>
    <certificate>/etc/filebeat/certs/filebeat.pem</certificate>
    <key>/etc/filebeat/certs/filebeat-key.pem</key>
  </ssl>
</indexer>
- Enable and start the Wazuh Manager services.
systemctl daemon-reload
systemctl enable wazuh-manager
systemctl start wazuh-manager
- Verify the Wazuh manager status
systemctl status wazuh-manager - Enable and start Filebeat service.
systemctl daemon-reload
systemctl enable filebeat
systemctl start filebeat
- Verify Filebeat installation.
filebeat test output
# Output
elasticsearch: https://127.0.0.1:9200...
  parse url... OK
  connection...
    parse host... OK
    dns lookup... OK
    addresses: 127.0.0.1
    dial up... OK
  TLS...
    security: server's certificate chain verification is enabled
    handshake... OK
    TLS version: TLSv1.3
    dial up... OK
  talk to server... OK
  version: 7.10.2
- Verify that Wazuh cluster is enabled and all of the nodes are connected.
/var/ossec/bin/cluster_control -l

Wazuh Dashboard Installation
Installation steps of Wazuh dashboard interface for mining and visualizing the Wazuh server alerts and archived events.
- Install the required packages.
apt install debhelper tar curl libcap2-bin #debhelper version 9 or later - Add Wazuh repositories
apt install gnupg apt-transport-https

curl -s https://packages.wazuh.com/key/GPG-KEY-WAZUH | gpg --no-default-keyring --keyring gnupg-ring:/usr/share/keyrings/wazuh.gpg --import && chmod 644 /usr/share/keyrings/wazuh.gpg

echo "deb [signed-by=/usr/share/keyrings/wazuh.gpg] https://packages.wazuh.com/4.x/apt/ stable main" | tee -a /etc/apt/sources.list.d/wazuh.list

apt update
- Install Wazuh dashboard.
apt -y install wazuh-dashboard - Edit the
/etc/wazuh-dashboard/opensearch_dashboards.ymlconfiguration file.
server.host: 0.0.0.0
server.port: 443
opensearch.hosts: ["https://10.0.118.5:9200", "https://10.0.118.6:9200", "https://10.0.118.7:9200"]
opensearch.ssl.verificationMode: certificate
- Deploy the certificates using the compressed certificates transferred earlier to the nodes
NODE_NAME=wazuh-dashboard
mkdir /etc/wazuh-dashboard/certs
tar -xf ./wazuh-certificates.tar -C /etc/wazuh-dashboard/certs/ ./$NODE_NAME.pem ./$NODE_NAME-key.pem ./root-ca.pem
mv -n /etc/wazuh-dashboard/certs/$NODE_NAME.pem /etc/wazuh-dashboard/certs/dashboard.pem
mv -n /etc/wazuh-dashboard/certs/$NODE_NAME-key.pem /etc/wazuh-dashboard/certs/dashboard-key.pem
chmod 500 /etc/wazuh-dashboard/certs
chmod 400 /etc/wazuh-dashboard/certs/*
chown -R wazuh-dashboard:wazuh-dashboard /etc/wazuh-dashboard/certs
- Enable and start Wazuh dashboard service.
systemctl daemon-reload
systemctl enable wazuh-dashboard
systemctl start wazuh-dashboard
- Edit the
/usr/share/wazuh-dashboard/data/wazuh/config/wazuh.ymlconfiguration file.
hosts:
   - default:
      url: https://10.0.118.8
      port: 55000
      username: wazuh-wui
      password: wazuh-wui
      run_as: false
Securing Wazuh Installation
This is about changing all default credentials used to protect the infrastructure from using simple default passwords.
- On any Wazuh indexer node, Use the Wazuh passwords tool to change the passwords of the Wazuh indexer users.
- NOTICE: Save the output for later use.
/usr/share/wazuh-indexer/plugins/opensearch-security/tools/wazuh-passwords-tool.sh --change-all
- NOTICE: Save the output for later use.
- On wazuh server master node: wazuh-server-master01, Download the Wazuh passwords tool and use it to change the passwords of the Wazuh API users.
curl -sO https://packages.wazuh.com/4.12/wazuh-passwords-tool.sh

bash wazuh-passwords-tool.sh --api --change-all --admin-user wazuh --admin-password wazuh
- On all your Wazuh server master and worker nodes, Run the following command to update the admin password in the Filebeat keystore.
- Replace
<ADMIN_PASSWORD>with the “admin” random password generated in the first step.echo <ADMIN_PASSWORD> | filebeat keystore add password --stdin --force
- Replace
- Restart Filebeat service on all wazuh manager server master and worker nodes.
systemctl restart filebeat - On Wazuh dashboard node: wazuh-dashboard, Run the following command to update the kibanaserver password in the Wazuh dashboard keystore.
- Replace
<KIBANASERVER_PASSWORD>with the “kibanaserver” random password generated in the first step.echo <KIBANASERVER_PASSWORD> | /usr/share/wazuh-dashboard/bin/opensearch-dashboards-keystore --allow-root add -f --stdin opensearch.password
- Replace
- Edit the
/usr/share/wazuh-dashboard/data/wazuh/config/wazuh.ymlconfiguration file on wazuh-dashboard server.- Replace
<WAZUH_WUI_PASSWORD>with the random password generated in the first step.
- Replace
hosts:
   - default:
      url: https://10.0.118.8
      port: 55000
      username: wazuh-wui
      password: <WAZUH_WUI_PASSWORD>
      run_as: false
- Restart the Wazuh dashboard service.
systemctl restart wazuh-dashboard
Nginx Configuration for Wazuh Dashboard
Create a reverse proxy configuration for Wazuh dashboard to be access via internal domain https://wazuh-dashboard.seccorp.local
- Generate self-signed certificate for Wazuh dashboard.
mkdir /etc/nginx/ssl
openssl req -x509 -nodes -days 365 -newkey rsa:2048 \
  -keyout /etc/nginx/ssl/wazuh-dashboard.seccorp.local.key \
  -out /etc/nginx/ssl/wazuh-dashboard.seccorp.local.crt \
  -subj "/CN=wazuh-dashboard.seccorp.local"
- Create and edit
/etc/nginx/sites-available/wazuh-dashboard.seccorp.local.conf
server {
    listen 80;
    server_name wazuh-dashboard.seccorp.local;
    return 301 https://$host$request_uri;
}

server {
    listen 443 ssl http2;
    server_name wazuh-dashboard.seccorp.local;

	ssl_certificate     /etc/nginx/ssl/wazuh-dashboard.seccorp.local.crt;
    ssl_certificate_key /etc/nginx/ssl/wazuh-dashboard.seccorp.local.key;
	ssl_protocols TLSv1.2 TLSv1.3;
    ssl_ciphers HIGH:!aNULL:!MD5;
    ssl_prefer_server_ciphers on;

    # Security Headers
    add_header X-Content-Type-Options "nosniff" always;
    add_header X-Frame-Options "SAMEORIGIN" always;
    add_header X-XSS-Protection "1; mode=block" always;
    add_header Referrer-Policy "no-referrer-when-downgrade" always;
    add_header Permissions-Policy "geolocation=(), microphone=(), camera=()" always;
    add_header Strict-Transport-Security "max-age=31536000; includeSubDomains" always;

    location / {
        proxy_pass https://10.0.118.11:443;
        proxy_ssl_verify off;

        # Preserve real client info
        proxy_set_header Host $host;
        proxy_set_header X-Real-IP $remote_addr;
        proxy_set_header X-Forwarded-For $proxy_add_x_forwarded_for;
        proxy_set_header X-Forwarded-Proto $scheme;

        # Timeout & buffering for dashboard
        proxy_read_timeout 90;
        proxy_connect_timeout 90;
        proxy_http_version 1.1;
        proxy_buffering off;
    }
}
- Enable the configuration.
ln -s /etc/nginx/sites-available/wazuh-dashboard.seccorp.local.conf /etc/nginx/sites-enabled/ - Verify configuration and reload Nginx service.
nginx -t
systemctl reload nginx
- Update your hosts file
/etc/hostson your machine to resolve thewazuh-dashboard.seccorp.localon your local DNS.10.0.118.4 wazuh-dashboard.seccorp.local
Nginx Load Balancer Configuration
A load balancer distributes workloads across multiple resources. In this case, it distributes Wazuh agents among the different worker nodes in a Wazuh server cluster.
- Go to the default path of Nginx and add the content below to
etc/nginx/conf.d/wazuh_load_balancer.confconfiguration file.
stream {
   upstream masternode {
       server 10.0.118.8:1515;  # wazuh-server-master01
   }
   upstream wazuhcluster {
   hash $remote_addr consistent;
       server 10.0.118.8:1514;  # wazuh-server-master01
       server 10.0.118.9:1514;  # wazuh-server-worker02
       server 10.0.118.10:1514; # wazuh-server-worker03
   }
   server {
       listen 1515;
       proxy_pass masternode;
   }
   server {
       listen 1514;
       proxy_pass wazuhcluster;
   }
}
- Modify the
/etc/nginx/nginx.conffile and move theinclude /etc/nginx/conf.d/*.confline of code from within thehttp{ }directive to above.
user www-data;
worker_processes auto;
pid /run/nginx.pid;
error_log /var/log/nginx/error.log;
include /etc/nginx/modules-enabled/*.conf;
include /etc/nginx/conf.d/*.conf;

events {
    worker_connections 768;
    # multi_accept on;
}

http {

}
- Verify configuration and reload Nginx service.
nginx -t
systemctl reload nginx
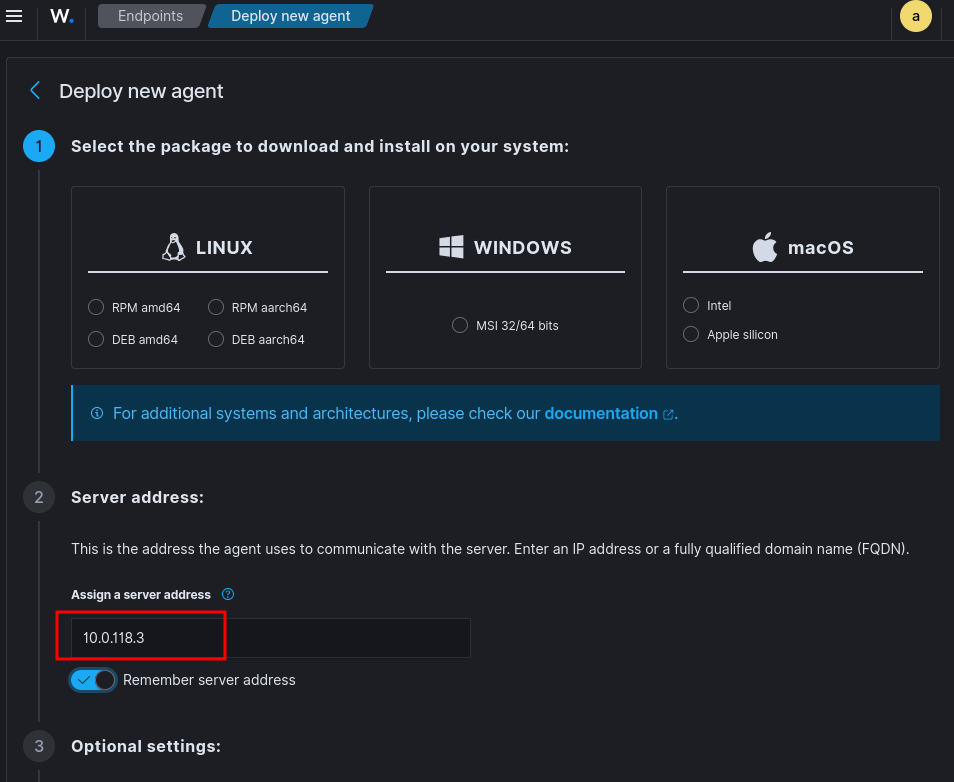
- Edit Wazuh agent configuration add the load balancer IP address.
<client>
  <server>
    <address>10.0.118.3</address>
    …
  </server>
</client>
Install IRIS Incident Response Management Platform
We will install IRIS Incident management platform to integrate it later with wazuh to manage incidents alerts.
| Hostname | RAM | CPU | Disk | IP Address |
|---|---|---|---|---|
| iris-dfir | 4 GB | 4 Cores | 50 GB | 10.0.118.12 |
- Install docker and git utiliy
sudo apt install docker.io wget jq git - Add docker to user’s group and then logout from your ssh connection login again
sudo usermod -aG docker <YOUR USERNAME> - Install latest version of docker-compose, Do this to avoid the old default version of docker-compose issues on ubuntu server
VERSION=$(curl --silent https://api.github.com/repos/docker/compose/releases/latest | jq .name -r)
DESTINATION=/usr/local/bin/docker-compose
sudo curl -L https://github.com/docker/compose/releases/download/${VERSION}/docker-compose-$(uname -s)-$(uname -m) -o $DESTINATION
sudo chmod 755 $DESTINATION
- Clone the IRIS project to the new deployed server
git clone https://github.com/dfir-iris/iris-web.git cd iris-web - Copy the environment file
cp .env.model .env - We will use the following command each time to generate secure passwords and secrets for IRIS to be places in
.envfile.openssl rand -base64 64 - The following variable will be need to change in
.envfile. Make sure the DB password does not contain symbols that could be interpreted as an DB url (i.e # and @).
POSTGRES_PASSWORD: Password of the postgres user
POSTGRES_ADMIN_PASSWORD: Password of the db admin user
IRIS_SECRET_KEY: Key used by Flask to secure the session cookies
IRIS_SECURITY_PASSWORD_SALT: A salt used for password encryption in the DB
IRIS_ADM_API_KEY: API key of the administrator.
- Modify the admin password in
.envfile by searching for variable called IRIS_ADM_PASSWORD and then define password for it
IRIS_ADM_PASSWORD=MySuperAdminPassword!
IRIS_ADM_PASSWORD=administrator
- We will comment out the nginx in
docker-compose.base.ymlanddocker-compose.ymlbecause we are already have our nginx reverse proxy, We will use it instead of nginx in docker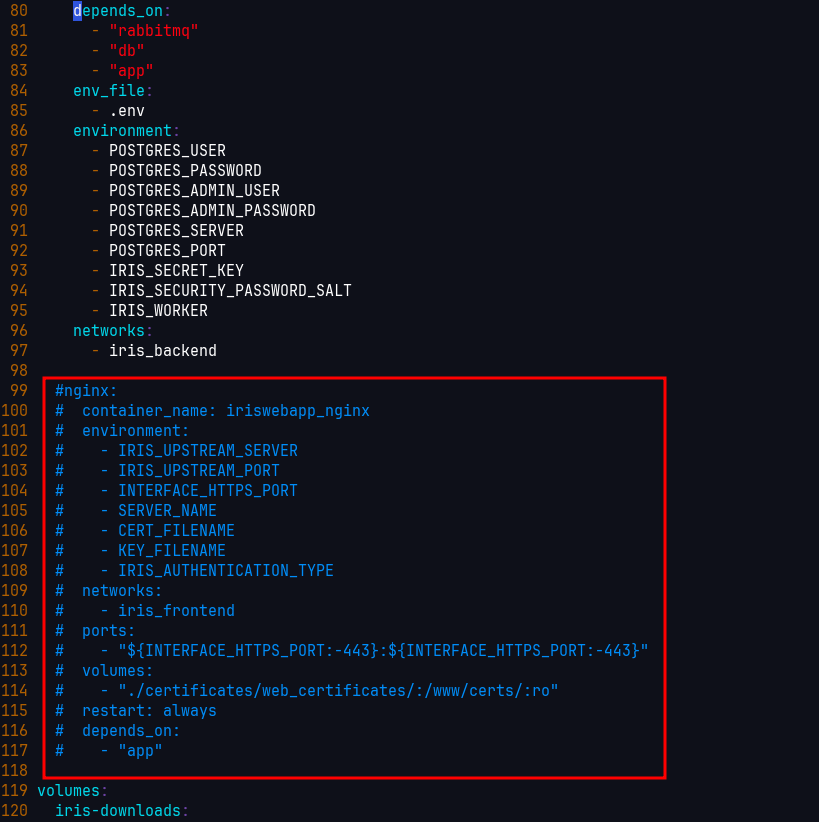
- And then we have to expose port 8000 from app container to be able to reach from our nginx proxy
  app:
    container_name: iriswebapp_app
    command: ['nohup', './iris-entrypoint.sh', 'iriswebapp']
    volumes:
      - ./certificates/rootCA/irisRootCACert.pem:/etc/irisRootCACert.pem:ro
      - ./certificates/:/home/iris/certificates/:ro
      - ./certificates/ldap/:/iriswebapp/certificates/ldap/:ro
      - iris-downloads:/home/iris/downloads
      - user_templates:/home/iris/user_templates
      - server_data:/home/iris/server_data
    restart: always
    depends_on:
      - "rabbitmq"
      - "db"
    ports:
      - 8000:8000 # Expose default port of IRIS webapp
    env_file:
      - .env
    environment:
      - POSTGRES_USER
      - POSTGRES_PASSWORD
      - POSTGRES_ADMIN_USER
      - POSTGRES_ADMIN_PASSWORD
      - POSTGRES_SERVER
      - POSTGRES_PORT
      - IRIS_SECRET_KEY
      - IRIS_SECURITY_PASSWORD_SALT
    networks:
      - iris_backend
      - iris_frontend
- Pull the Docker containers
docker-compose up -d --build
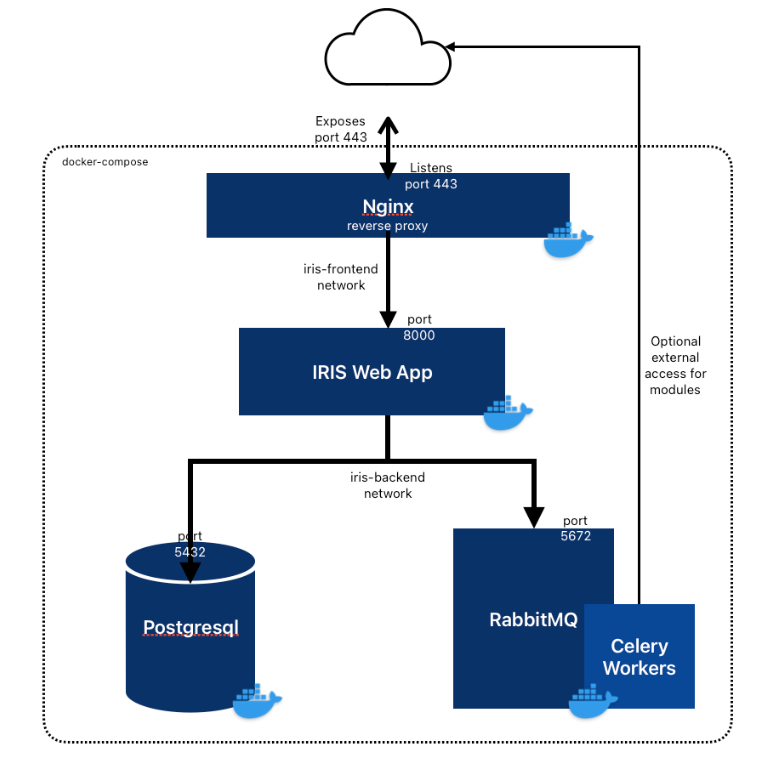
- Now create a reverse proxy on our nginx-main-proxy server, go the nginx server and and create the following nginx configuration in
/etc/nginx/sites-available/iris.seccorp.local.conffile.
server {
listen          443 ssl;
server_name     iris.seccorp.local;

ssl_certificate             /etc/nginx/ssl/iris.seccorp.local.crt;
ssl_certificate_key         /etc/nginx/ssl/iris.seccorp.local.key;
ssl_protocols               TLSv1.2 TLSv1.3;
ssl_prefer_server_ciphers   on;
ssl_ecdh_curve              secp521r1:secp384r1:prime256v1;
ssl_buffer_size             4k;
ssl_session_tickets         off;
ssl_session_cache           none;

add_header Content-Security-Policy "default-src 'self' https://analytics.dfir-iris.org; script-src 'self' 'unsafe-inline' https://analytics.dfir-iris.org; style-src 'self' 'unsafe-inline'; img-src 'self' data:;";
add_header X-XSS-Protection             "1; mode=block";
add_header X-Frame-Options              DENY;
add_header X-Content-Type-Options       nosniff;
add_header Strict-Transport-Security    "max-age=31536000; includeSubDomains" always;
add_header Front-End-Https              on;

access_log /var/log/nginx/audit_platform_access.log;
error_log  /var/log/nginx/audit_platform_error.log debug;

location / {
    proxy_pass http://10.0.118.12:8000;
    proxy_http_version 1.1;
    proxy_set_header Upgrade $http_upgrade;
    proxy_set_header Connection 'upgrade';
    proxy_set_header Host $host;
    proxy_cache_bypass $http_upgrade;
    proxy_set_header X-Forwarded-Proto $scheme;
    proxy_set_header X-Forwarded-For $remote_addr;
    proxy_set_header Origin $http_origin;
}

location /api/v2/ {
    proxy_pass http://10.0.118.12:8000;

    location ~ ^/(manage/templates/add|manage/cases/upload_files) {
        keepalive_timeout           10m;
        client_body_timeout         10m;
        send_timeout                10m;
        proxy_read_timeout          10m;
        client_max_body_size        0M;
        proxy_request_buffering     off;
        proxy_pass http://10.0.118.12:8000;
    }

    location ~ ^/(datastore/file/add|datastore/file/add-interactive) {
        keepalive_timeout           10m;
        client_body_timeout         10m;
        send_timeout                10m;
        proxy_read_timeout          10m;
        client_max_body_size        0M;
        proxy_request_buffering     off;
        proxy_pass http://10.0.118.12:8000;
    }
}

location /socket.io {
    proxy_set_header Host $http_host;
    proxy_set_header X-Real-IP $remote_addr;
    proxy_set_header X-Forwarded-For $proxy_add_x_forwarded_for;
    proxy_set_header X-Forwarded-Proto $scheme;
    proxy_http_version 1.1;
    proxy_buffering off;
    proxy_set_header Upgrade $http_upgrade;
    proxy_set_header Connection "Upgrade";
    proxy_pass http://10.0.118.12:8000/socket.io;
}

location = /50x.html {
    root   /usr/share/nginx/html;
}

}
- Generate SSL self-signed certificate for IRIS.
openssl req -x509 -nodes -days 365 -newkey rsa:2048 -keyout /etc/nginx/ssl/iris.seccorp.local.key -out /etc/nginx/ssl/iris.seccorp.local.crt -subj "/CN=iris.seccorp.local"
- Enable the configuration, test nginx configurations and reload the nginx service.
sudo ln -sf /etc/nginx/sites-available/iris.seccorp.local.conf /etc/nginx/sites-enabled/
nginx -t
sudo systemctl reload nginx
- On your host machine, Edit your
/etc/hostsfile to access IRIS with the local domain.10.0.118.4 iris.seccorp.local - Now go to https://iris.seccorp.local and enter the credentials we have already assigned before. It should open without any issues.
Enhancing incident response with Wazuh and DFIR-IRIS integration
Integrating DFIR-IRIS with the Wazuh XDR and SIEM platform provides a framework that streamlines security monitoring and incident response. This integration enables incident response teams to correlate security events, track investigation progress, and coordinate response actions.
- Log into the DFIR-IRIS dashboard with an administrator account.
- Navigate to Advanced > Access control and select the user you wish to add to the customer account. Select the Customers tab in the pop-up, click Manage, add the customer you want to map the selected user to, and click Save.
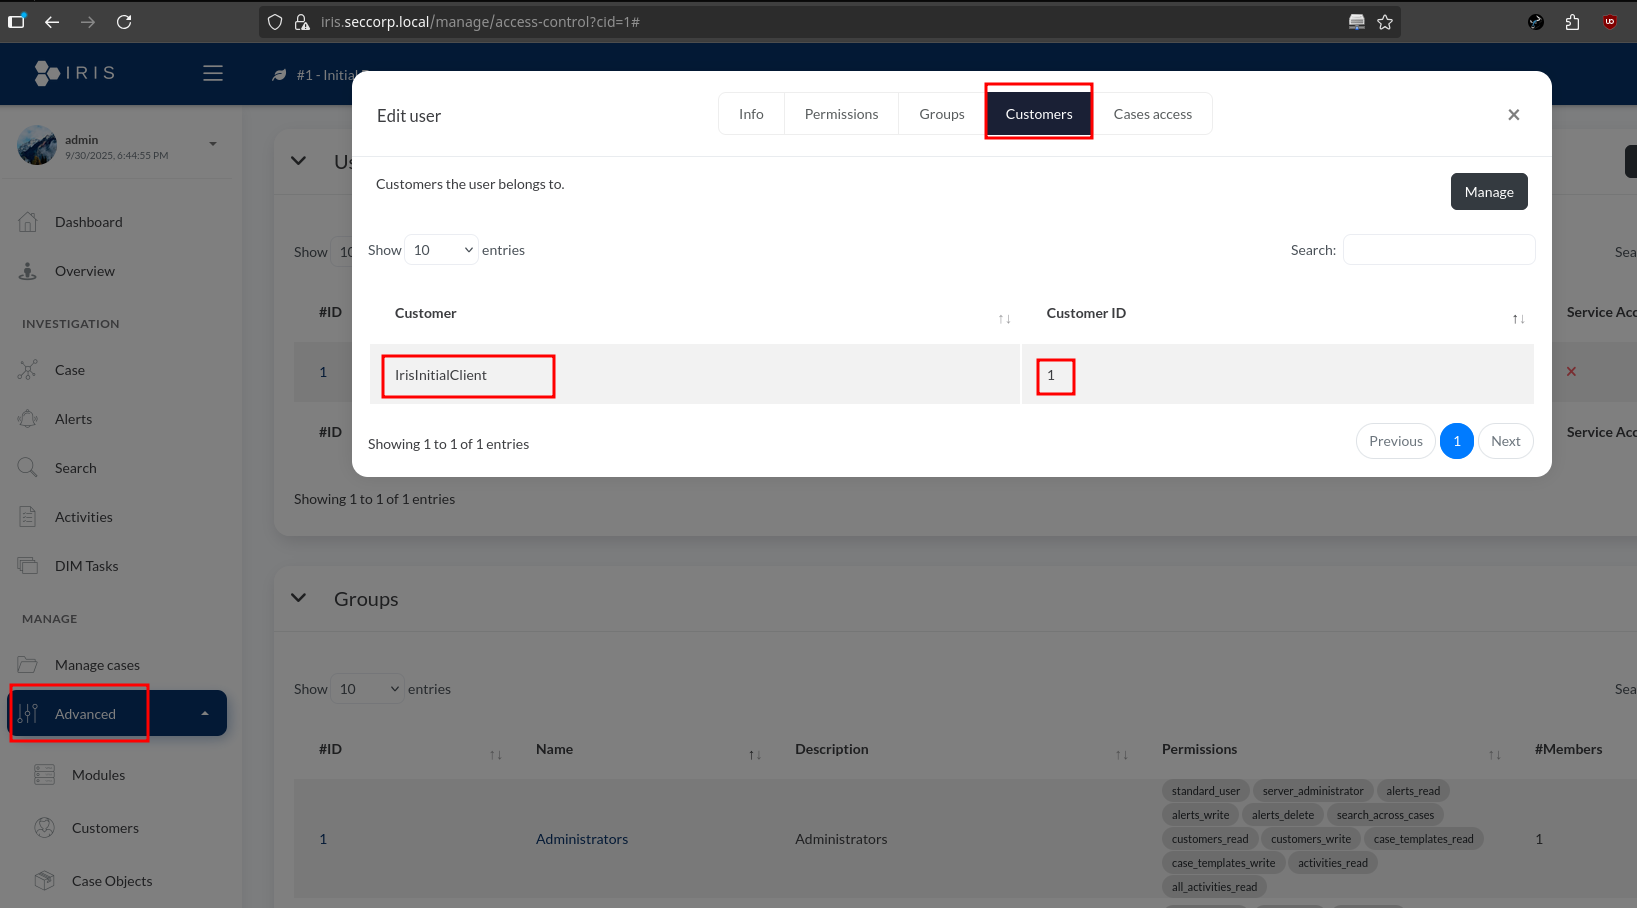
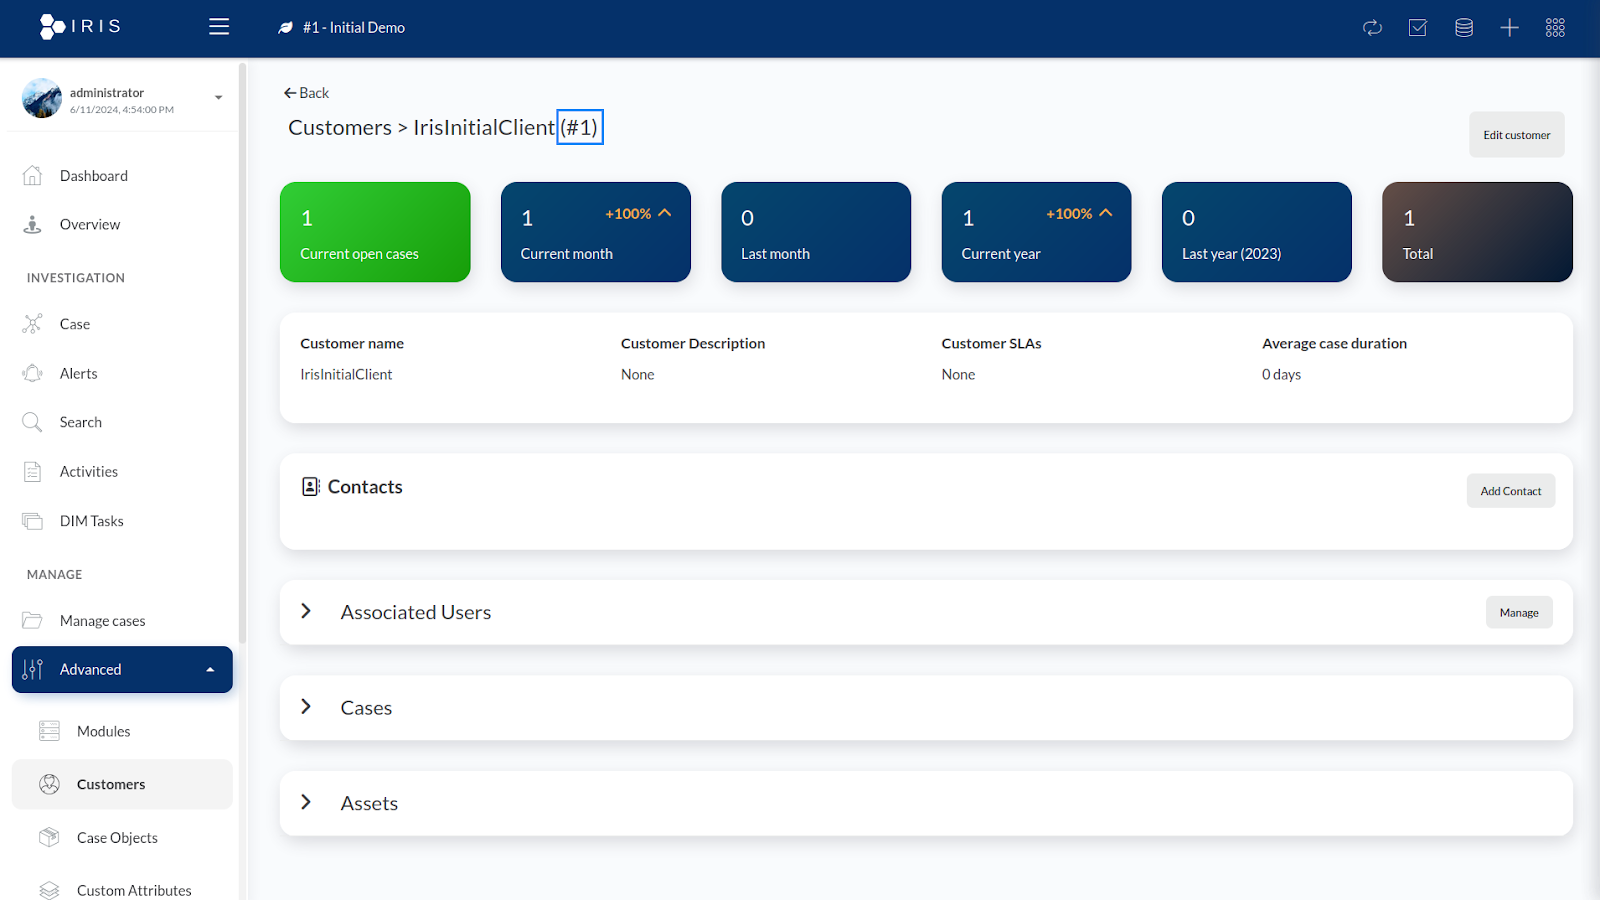
- Find your customer ID by navigating to Advanced > Customers, and select the customer you want to perform the integration for. Note the customer ID displayed at the top of the page as you will use this when configuring the Wazuh server.
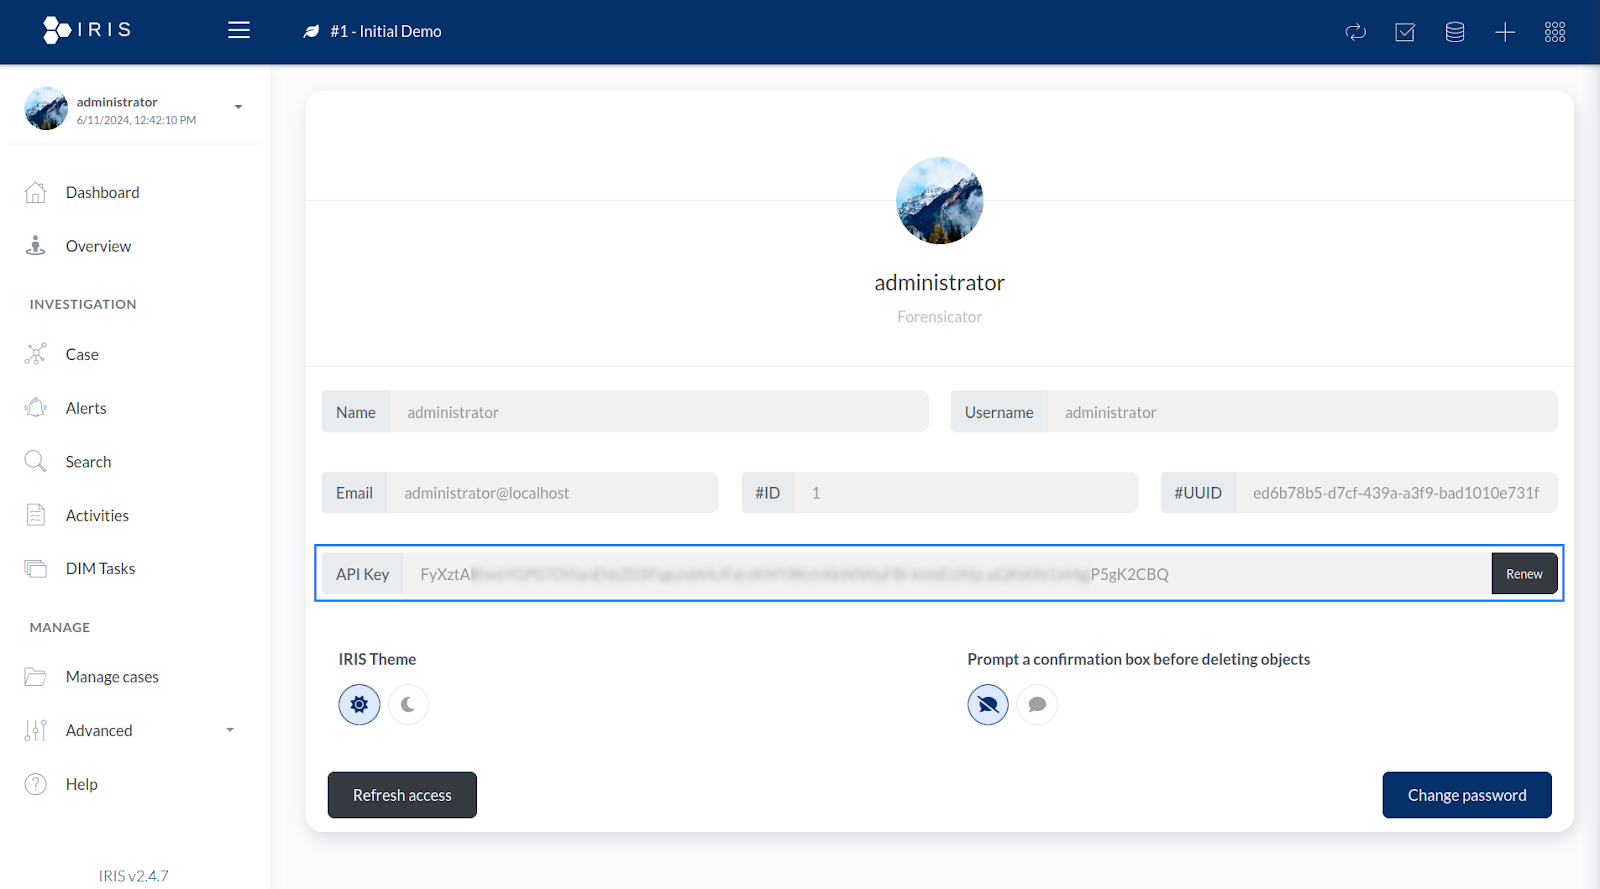
- Obtain the API key for the logged in DFIR-IRIS user by clicking on the username and selecting My settings.
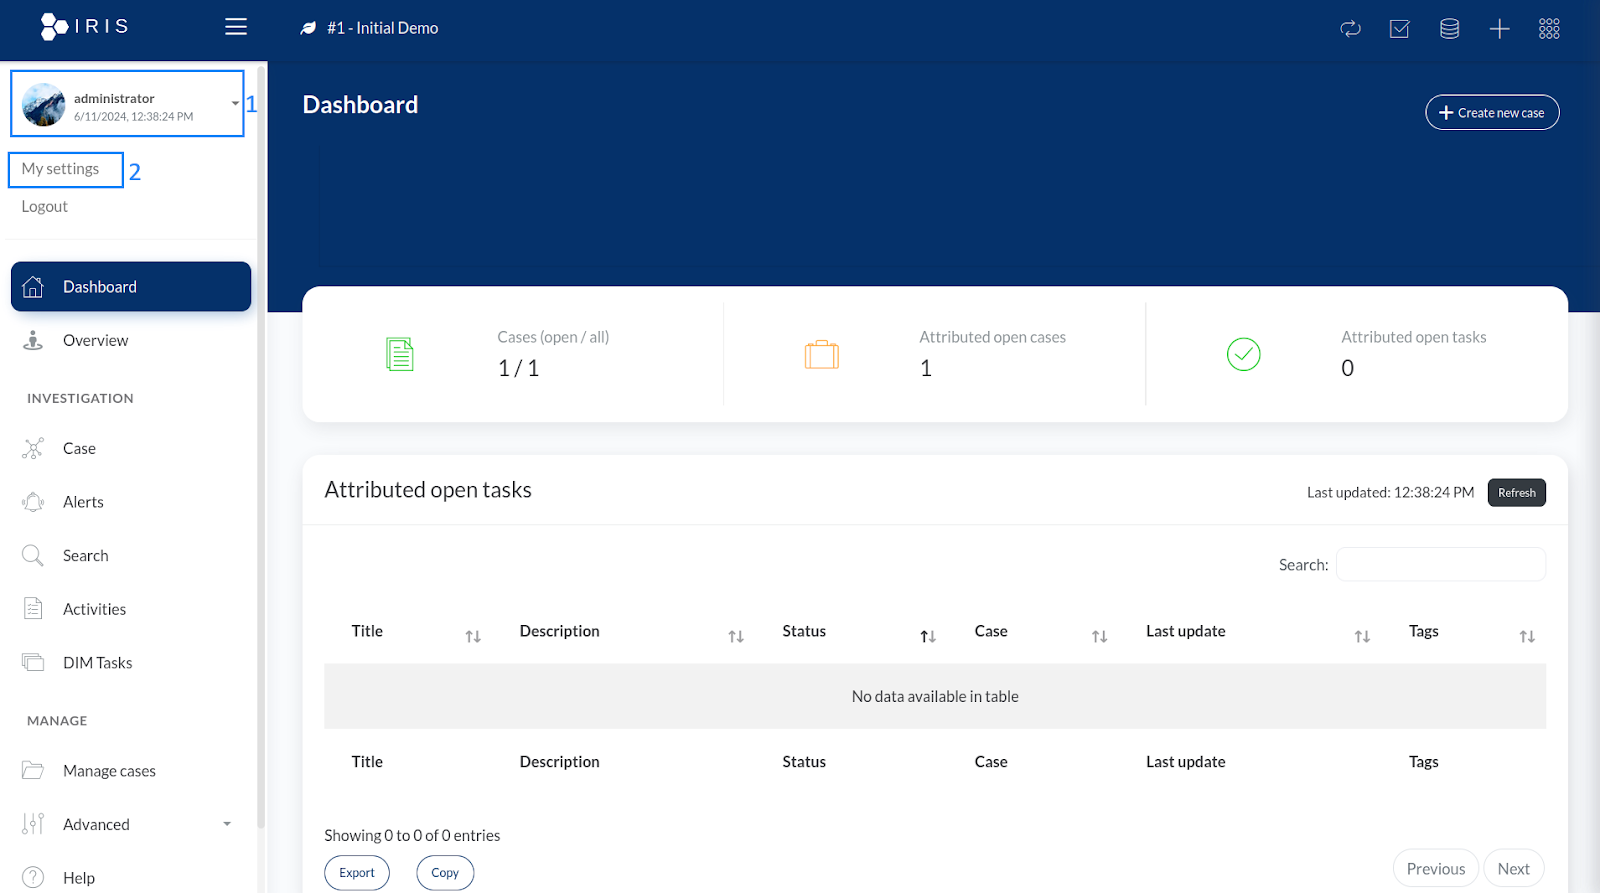
- Copy your user API key. You will use this when configuring the Wazuh server.
- Go to wazuh master node wazuh-server-master01 and place the following the integration python script to
/var/ossec/integrations/custom-wazuh_iris.py.
#!/var/ossec/framework/python/bin/python3
# custom-wazuh_iris.py
# Custom Wazuh integration script to send alerts to DFIR-IRIS

import sys
import json
import requests
import logging
from datetime import datetime

# Configure logging
logging.basicConfig(filename='/var/ossec/logs/integrations.log', level=logging.INFO,
                    format='%(asctime)s %(levelname)s: %(message)s', datefmt='%Y-%m-%d %H:%M:%S')

# Function to create a formatted string from alert details
def format_alert_details(alert_json):
    rule = alert_json.get("rule", {})
    agent = alert_json.get("agent", {})

    # Extracting MITRE information from the nested 'rule' structure
    mitre = rule.get("mitre", {})
    mitre_ids = ', '.join(mitre.get("id", ["N/A"]))
    mitre_tactics = ', '.join(mitre.get("tactic", ["N/A"]))
    mitre_techniques = ', '.join(mitre.get("technique", ["N/A"]))

    details = [
        f"Rule ID: {rule.get('id', 'N/A')}",
        f"Rule Level: {rule.get('level', 'N/A')}",
        f"Rule Description: {rule.get('description', 'N/A')}",
        f"Agent ID: {agent.get('id', 'N/A')}",
        f"Agent Name: {agent.get('name', 'N/A')}",
        f"MITRE IDs: {mitre_ids}",
        f"MITRE Tactics: {mitre_tactics}",
        f"MITRE Techniques: {mitre_techniques}",
        f"Location: {alert_json.get('location', 'N/A')}",
        f"Full Log: {alert_json.get('full_log', 'N/A')}"
    ]
    return '\n'.join(details)

def main():
    # Read parameters when integration is run
    if len(sys.argv) < 4:
        logging.error("Insufficient arguments provided. Exiting.")
        sys.exit(1)

    alert_file = sys.argv[1]
    api_key = sys.argv[2]
    hook_url = sys.argv[3]

    # Read the alert file
    try:
        with open(alert_file) as f:
            alert_json = json.load(f)
    except Exception as e:
        logging.error(f"Failed to read alert file: {e}")
        sys.exit(1)

    # Prepare alert details
    alert_details = format_alert_details(alert_json)

    # Convert Wazuh rule levels(0-15) -> IRIS severity(1-6)
    alert_level = alert_json.get("rule", {}).get("level", 0)
    if alert_level < 5:
        severity = 2
    elif alert_level >= 5 and alert_level < 7:
        severity = 3
    elif alert_level >= 7 and alert_level < 10:
        severity = 4
    elif alert_level >= 10 and alert_level < 13:
        severity = 5
    elif alert_level >= 13:
        severity = 6
    else:
        severity = 1

    # Generate request
    payload = json.dumps({
        "alert_title": alert_json.get("rule", {}).get("description", "No Description"),
        "alert_description": alert_details,
        "alert_source": "Wazuh",
        "alert_source_ref": alert_json.get("id", "Unknown ID"),
        "alert_source_link": "https://10.0.118.11/app/wz-home",  # Replace with actual Wazuh dashboard IP address
        "alert_severity_id": severity,
        "alert_status_id": 2,  # 'New' status
        "alert_source_event_time": alert_json.get("timestamp", "Unknown Timestamp"),
        "alert_note": "",
        "alert_tags": f"wazuh,{alert_json.get('agent', {}).get('name', 'N/A')}",
        "alert_customer_id": 1,  # '1' for default 'IrisInitialClient'
        "alert_source_content": alert_json  # raw log
    })

    # Send request to IRIS
    try:
        response = requests.post(hook_url, data=payload, headers={"Authorization": "Bearer " + api_key, "content-type": "application/json"}, verify=False)
        if response.status_code in [200, 201, 202, 204]:
            logging.info(f"Sent alert to IRIS. Response status code: {response.status_code}")
        else:
            logging.error(f"Failed to send alert to IRIS. Response status code: {response.status_code}")
    except Exception as e:
        logging.error(f"Failed to send alert to IRIS: {e}")
        sys.exit(1)

if __name__ == "__main__":
    main()
- Set the ownership and permissions of the
/var/ossec/integrations/custom-wazuh_iris.pyfile so that the root user and the wazuh group have access to it.
chmod 750 /var/ossec/integrations/custom-wazuh_iris.py
chown root:wazuh /var/ossec/integrations/custom-wazuh_iris.py
- Append the following configuration to the
/var/ossec/etc/ossec.conffile to forward all alerts with a severity of 7 or higher to DFIR-IRIS.
<ossec_config>

  <!-- IRIS integration -->
  <integration>
    <name>custom-wazuh_iris.py</name>
    <hook_url>https://iris.seccorp.local/alerts/add</hook_url>
    <level>7</level>
    <api_key><IRIS_API_KEY></api_key> <!-- Replace with your IRIS API key -->
    <alert_format>json</alert_format>
  </integration>

</ossec_config>
- Append the following to
/etc/hostson wazuh master server wazuh-server-master01 node.10.0.118.4 iris.seccorp.local - Restart wazuh-manager service.
systemctl restart wazuh-manager
I will try to test a bruteforce attack on one of wazuh servers to check if we might get alerts. 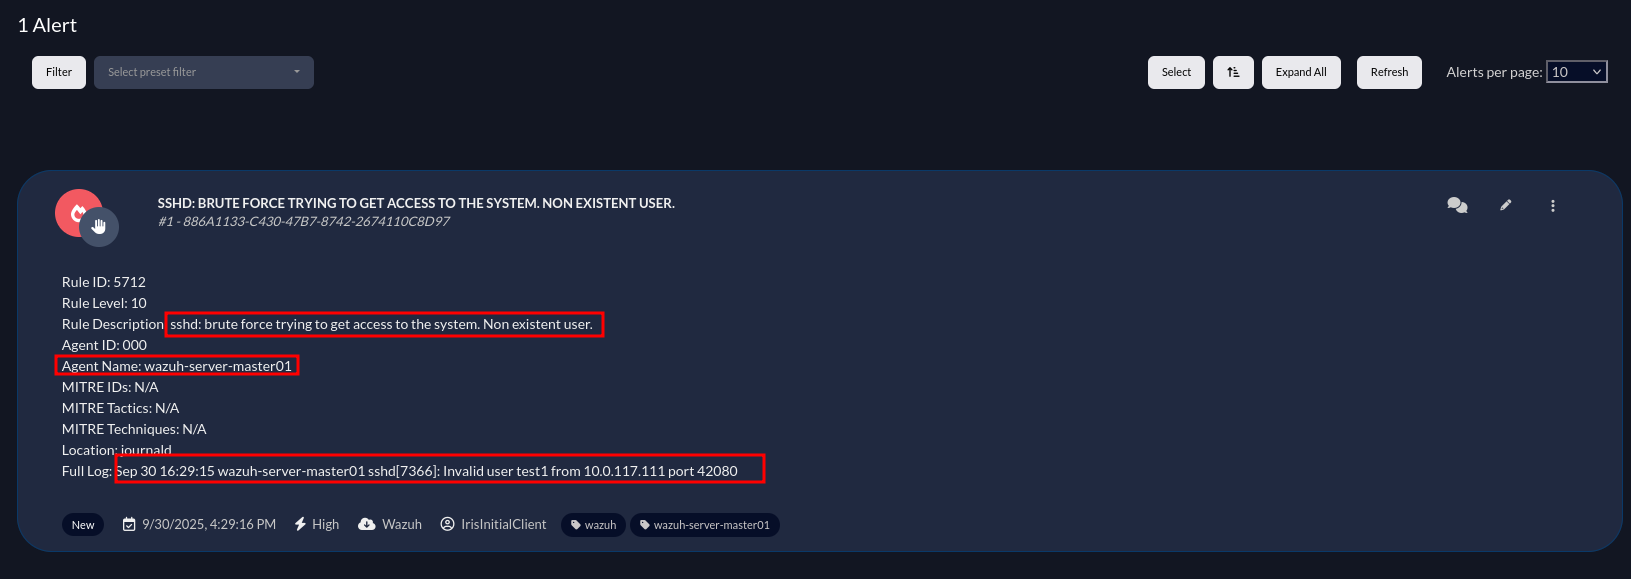
Malware detection on linux agent using ClamAV
Wazuh detects malicious files through integration with ClamAV, a free and open source antimalware engine for detecting various types of malware, including viruses and trojans.
- Install ClamAV on ubuntu machine that have wazuh agent installed on it.
sudo apt install clamav clamav-daemon - Update ClamAV signature database.
sudo systemctl stop clamav-freshclam sudo freshclam - To collect ClamAV logs from Linux endpoints, remove the
#comment tag before theLogSyslog truestatement in/etc/clamav/clamd.confand/etc/clamav/freshclam.confAs wazuh agent reads the logs inside/var/log/sysloglog file.LogSyslog true - Start ClamAV services.
sudo systemctl enable clamav-freshclam clamav-daemon sudo systemctl start clamav-freshclam clamav-daemon - Now go to wazuh-server-master01 and modify the IRIS integration to deliver another rule levels.
<ossec_config>

  <!-- IRIS integration -->
  <integration>
    <name>custom-wazuh_iris.py</name>
    <hook_url>https://iris.seccorp.local/alerts/add</hook_url>
    <level>7</level>
    <level>3</level>
    <level>10</level>
    <level>8</level>
    <api_key>YOUR_API_KEY</api_key> <!-- Replace with your IRIS API key -->
    <alert_format>json</alert_format>
  </integration>

</ossec_config>
- Restart wazuh-server on wazuh-server-master01 node.
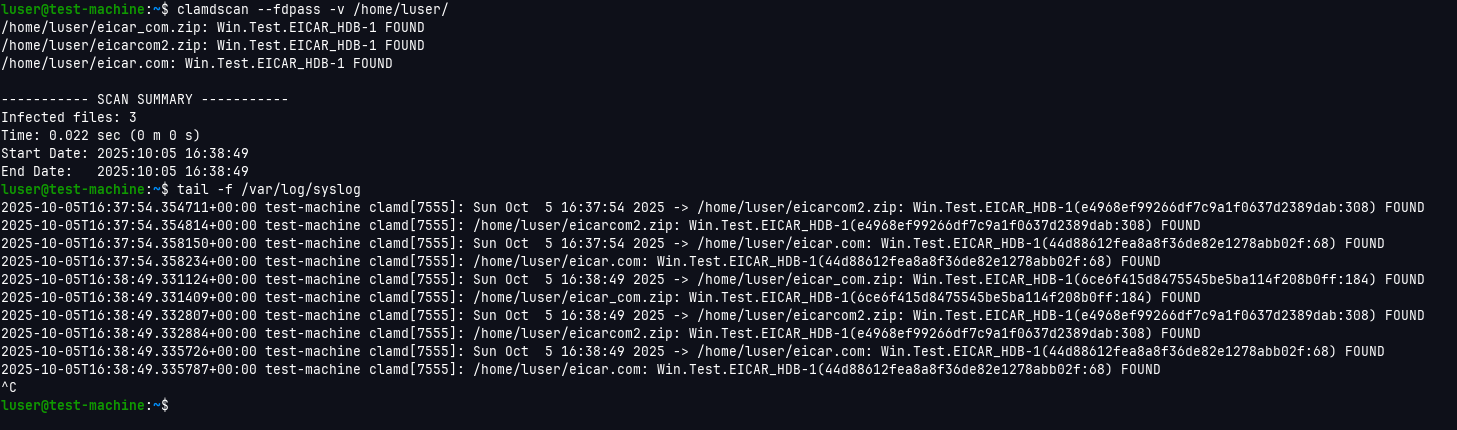
sudo systemctl restart wazuh-server - Now I tested if the alerts will be delivered by downloading malware test file from https://www.eicar.org/download-anti-malware-testfile/ on our ubuntu machine with wazuh agent. and then scan the current directory with ClamAV scanner.
clamdscan --fdpass -v YOUR_PATH_WITH_MALWARE
-
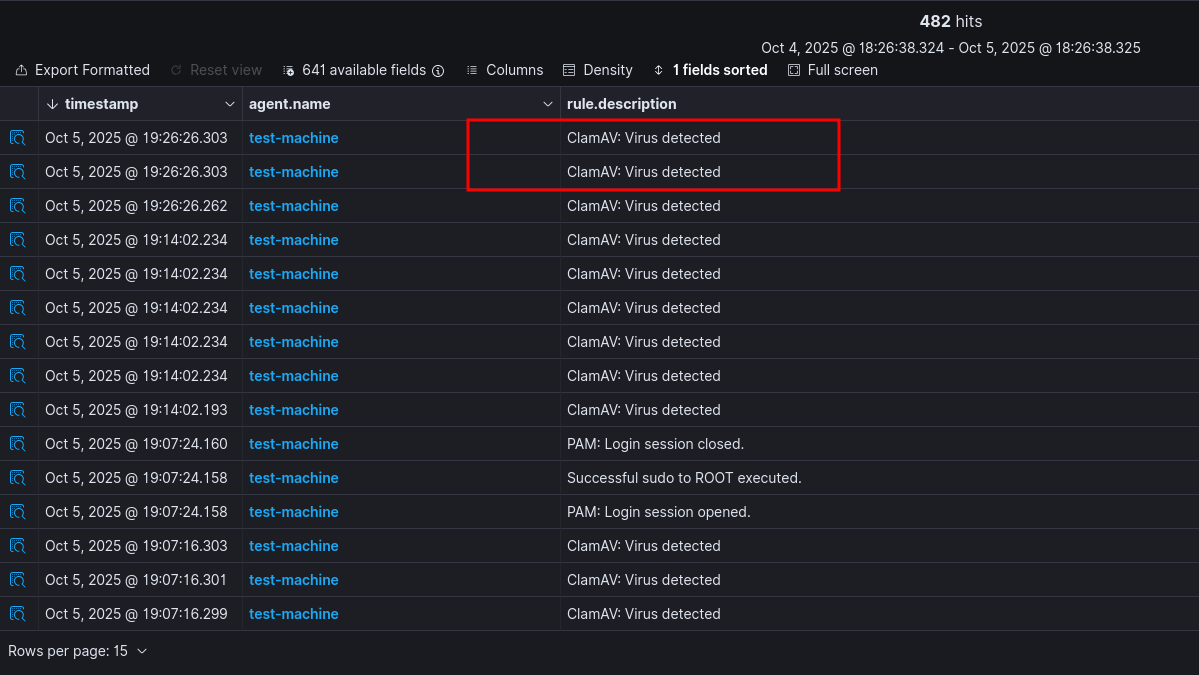
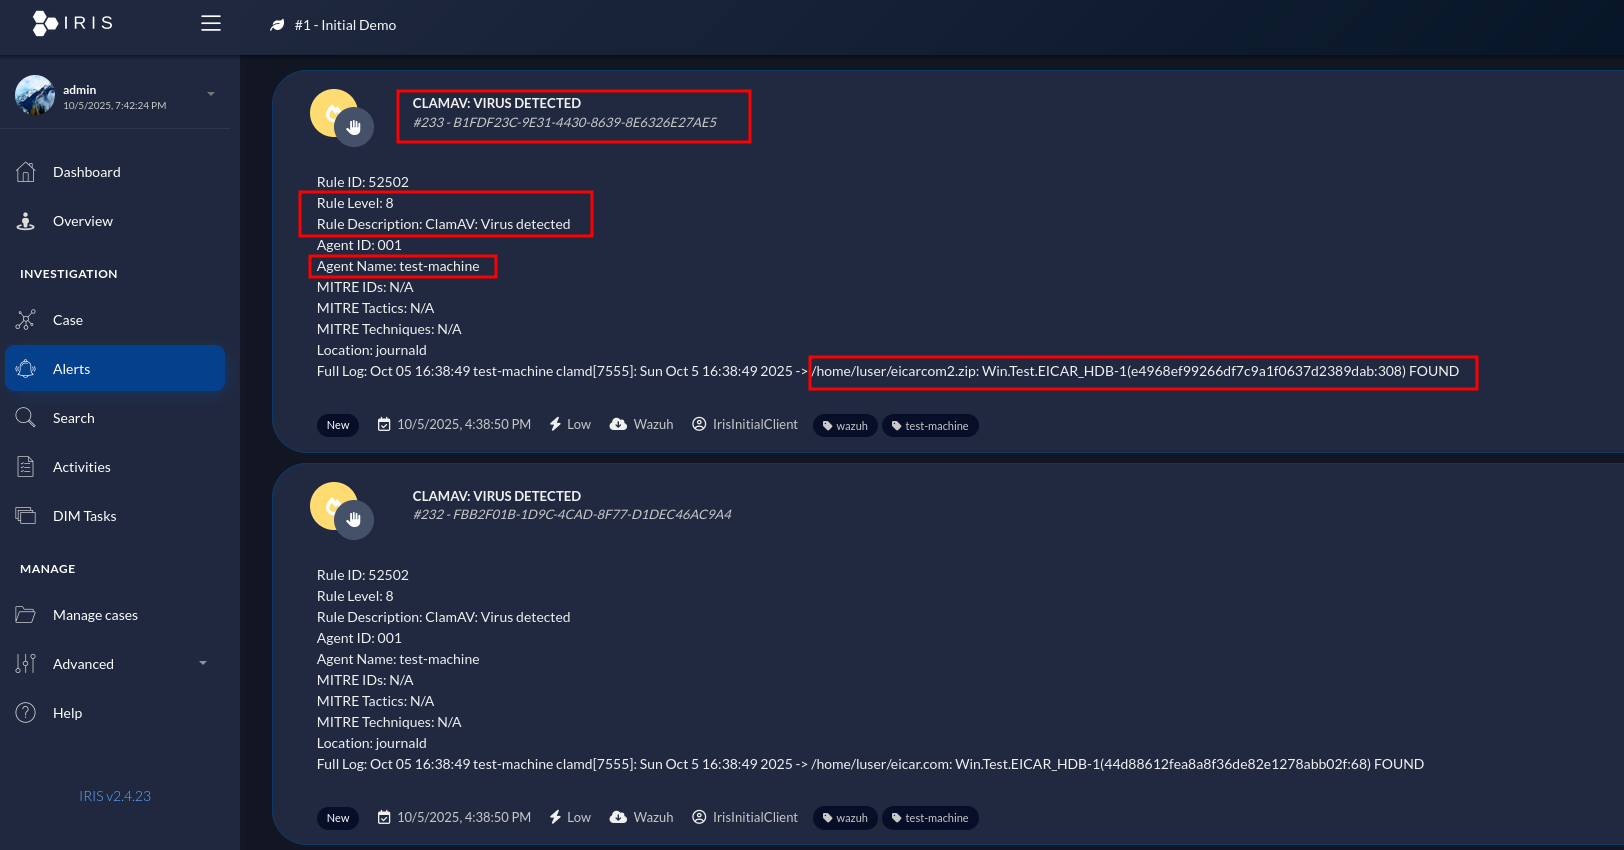
Check the logs in wazuh dashboard and will see that alerts is shown.
-
Alerts has been sent to IRIS.
Integrate Suricata with Wazuh for as NIDS
Wazuh integrates with a network-based intrusion detection system (NIDS) to enhance threat detection by monitoring and analyzing network traffic.
- Install suricata on our ubuntu endpoint that have wazuh agent deployed on it.
sudo add-apt-repository ppa:oisf/suricata-stable
sudo apt-get update
sudo apt-get install suricata -y
-
Go to https://rules.emergingthreats.net/open/ and open suricata with latest version and copy the link of
emerging.rules.tar.gzto download it later. -
Download and extract the Emerging Threats Suricata ruleset.
cd /tmp/ && curl -LO https://rules.emergingthreats.net/open/suricata-7.0.3/emerging.rules.tar.gz
sudo tar -xvzf emerging.rules.tar.gz && sudo mkdir /etc/suricata/rules && sudo mv rules/*.rules /etc/suricata/rules/
sudo chmod 777 /etc/suricata/rules/*.rules
- Modify Suricata settings in the
/etc/suricata/suricata.yamlfile and set the following variables.
HOME_NET: "<MACHINE_IP>"
EXTERNAL_NET: "any"

default-rule-path: /etc/suricata/rules
rule-files:
- "*.rules"

# Global stats configuration
stats:
enabled: yes

# Linux high speed capture support
af-packet:
  - interface: <MACHINE_INTERFACE>
- Restart the Suricata service.
sudo systemctl restart suricata - Add the following configuration to the
/var/ossec/etc/ossec.conffile of the Wazuh agent. This allows the Wazuh agent to read the Suricata logs file.
<ossec_config>
  <localfile>
    <log_format>json</log_format>
    <location>/var/log/suricata/eve.json</location>
  </localfile>
</ossec_config>
- Restart the Wazuh agent to apply the changes.
sudo systemctl restart wazuh-agent - Test attack simulation.
ping -c 20 <MACHINE_IP> - You can visualize the alert data in the Wazuh dashboard. To do this, go to the Threat Hunting module and add the filters in the search bar to query the alerts
rule.groups:suricata.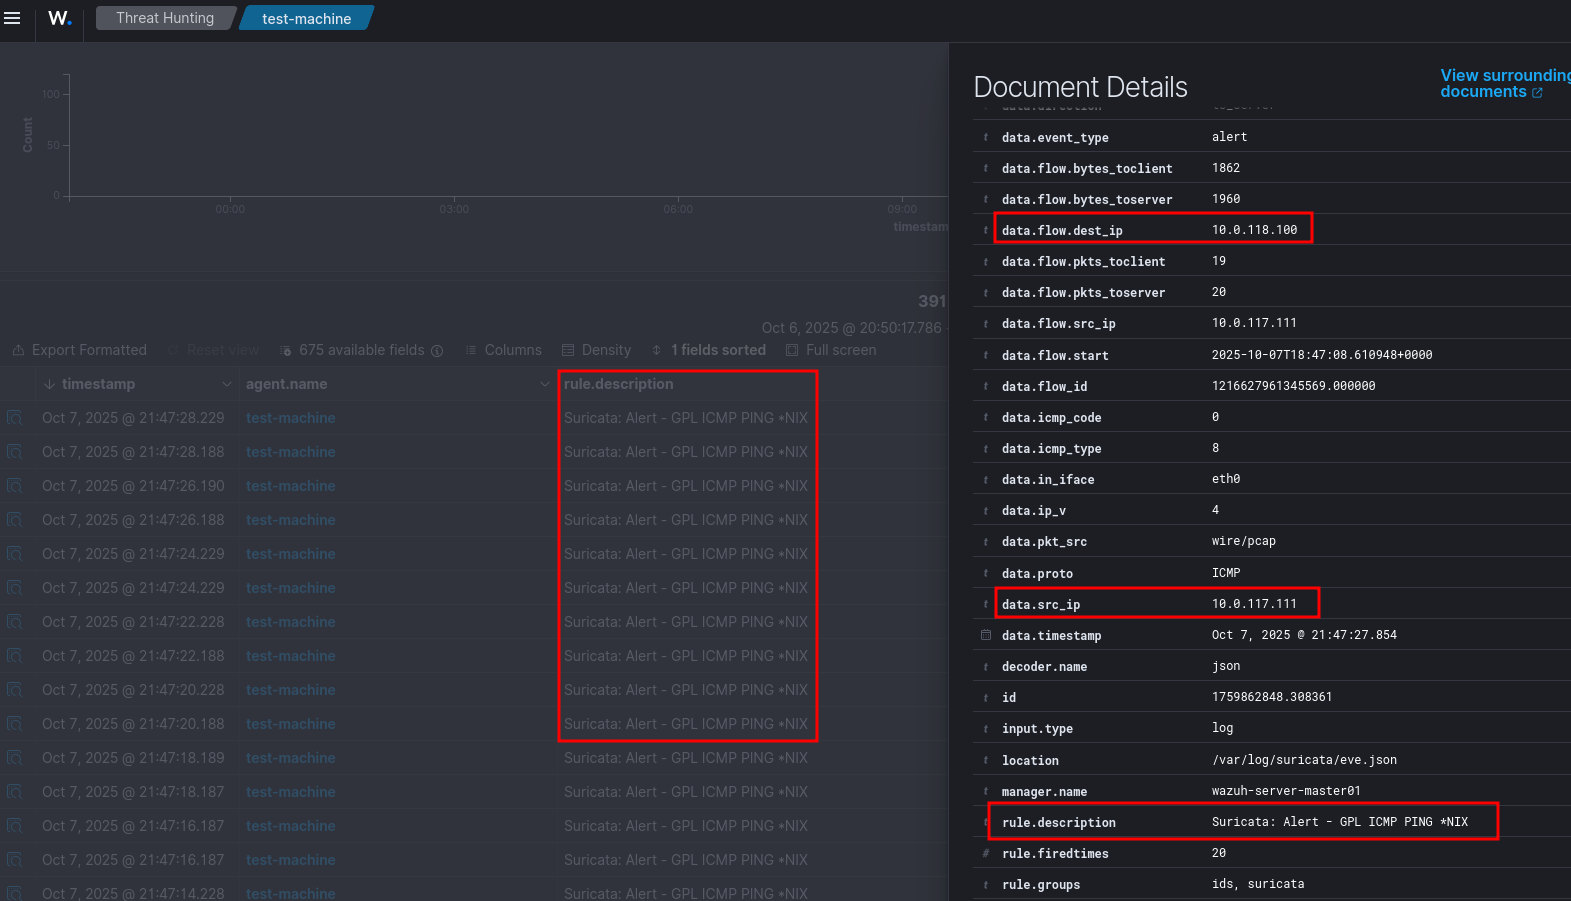