This is walkthrough of detailed installation of CAPEv2 sandbox with all of recommended configurations to be ready to use in production environments as SOC malware analysis lab.
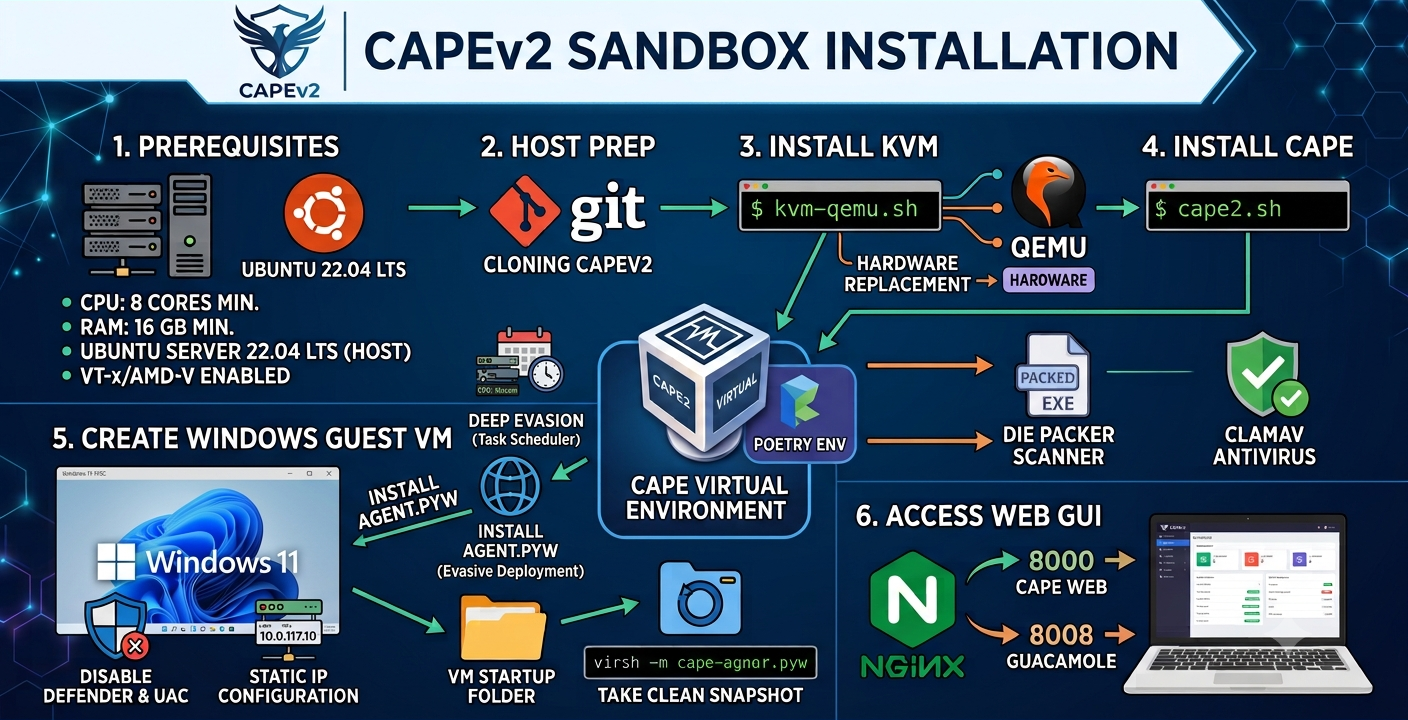
Prerequisites
Host OS:
- Any Operating System
- Intel VT-x / AMD-V enabled
- Nested virtualization enabled
- Any hypervisor of your choise (VirtualBox, VMWare, KVM, etc.)
Guest:
- Ubuntu Server 22.04 LTS
Sandbox:
- Windows 10 IoT Enterprise LTSC 2021 x64
Resources:
- 8 CPU cores minimum
- 8 GB RAM minimum
- 150 GB storage recommended
Prepare for the installation
- Update and upgrade
sudo apt update sudo apt upgrade sudo apt install git - Clone CAPEv2 project
git clone https://github.com/kevoreilly/CAPEv2.git - Replace every
<WOOT>tag with real hardware patterns inkvm-qemu.shinstaller
# vim CAPEv2/installer/kvm-qemu.sh
PEN_REPLACER='Wacom'

PCI_VENDOR_ID_REPLACEMENT='0x8086'   # Intel

SCSI_REPLACER='Samsung'

ATAPI_REPLACER='HL-DT-ST'

MICRODRIVE_REPLACER='SanDisk'

BOCHS_BLOCK_REPLACER='Samsung'
BOCHS_BLOCK_REPLACER2='Seagate'
BOCHS_BLOCK_REPLACER3='Kingston'

BXPC_REPLACER='DELL'

BOCHS_SEABIOS_BLOCK_REPLACER='AMI'
Start the installation of CAPE
- Install KVM with installer provided by CAPE
sudo ./kvm-qemu.sh all $USER # After finishing reboot - Install CAPE
cd CAPEv2/installer sudo ./cape2.sh all cape # After finishing reboot - Install CAPE dependencies
cd /opt/CAPEv2 sudo apt install qemu-kvm qemu-utils /etc/poetry/bin/poetry install sudo -u cape /etc/poetry/bin/poetry run pip install -r extra/optional_dependencies.txt - Confirm if virtual environment is active
/etc/poetry/bin/poetry env list
- Switch to cape user
sudo su - cape - Add the following to
.bashrcof cape userexport LIBVIRT_DEFAULT_URI="qemu:///system" - Reload
.bashrcto apply the changessource ~/.bashrc - Edit the default network range
The default 192.168.122.0/24 subnet commonly conflicts with nested libvirt environments. Changing it prevents libvirt from refusing to start the network
virsh net-edit default
- The XML should be something similar to this
<network>
  <name>default</name>
  <uuid>0e14f40c-fff5-410b-8bc9-1a7ec48229ff</uuid>
  <forward mode='nat'/>
  <bridge name='virbr0' stp='on' delay='0'/>
  <mac address='52:54:00:92:dd:38'/>
  <ip address='10.0.117.1' netmask='255.255.255.0'>
    <dhcp>
      <range start='10.0.117.2' end='10.0.117.254'/>
    </dhcp>
  </ip>
</network>
- CAPE Configurations
cd /opt/CAPEv2/conf - cuckoo.conf
machinery_screenshots = on memory_dump = on freespace = 0 # Avoid space errors freespace_processing = 0 # In resultserver section [resultserver] ip = 192.168.122.50 #Change it with your current IP or 0.0.0.0 store_csvs = on - kvm.conf
ip = 10.0.117.10 #below [cuckoo1] tags = winxp,acrobat_reader_6,x64 arch = x64 - api.conf
[api] ratelimit = no - auxiliary.conf
[auxiliary_modules]
browser = yes
curtain = yes
digisig = yes
disguise = yes
evtx = yes
human_windows = yes
human_linux = yes
procmon = yes
recentfiles = yes
sysmon_windows = yes
tlsdump = yes
usage = yes
file_pickup = yes
permissions = yes
pre_script = yes
during_script = yes
filecollector = yes
browsermonitor = yes
- mitmdump.conf
host = 10.0.117.1 interface = virbr0 - routing.conf
enable_pcap = yes route = internet internet = virbr0 nat = yes - web.conf
[url_analysis] enabled = yes [tlp] enabled = yes [delete] enabled = yes [dlnexec] enabled = yes [url_analysis] enabled = yes [tlp] enabled = yes public_red = yes [expanded_dashboard] enabled = yes [display_et_portal] enabled = yes [display_pt_portal] enabled = yes [evtx_download] enabled = yes [guacamole] enabled = yes mode = vnc username = password = guacd_host = 127.0.0.1 guacd_port = 4822 vnc_host = 127.0.0.1 guest_protocol = vnc [yara_detail] enabled = yes [display_cape_yara] enabled = yes [hunt] enabled = yes - reporting.conf
[mitre] enabled = yes # Community [reporthtml] enabled = yes screenshots = yes apicalls = no index_clamav = yes - processing.conf
[sysmon] enabled = yes [detections] enabled = yes # Signatures behavior = yes yara = yes suricata = yes virustotal = no #unless you have VT API key clamav = yes [die] enabled = yes - Enable the virtual interface
virsh net-list --all #if there's default network inactive virsh net-autostart default virsh net-start default - Install Detect-It-Easy Engine (Go to https://github.com/horsicq/DIE-engine/releases and download the latest version available for ubuntu 22)
cd /tmp; wget -c https://github.com/horsicq/DIE-engine/releases/download/3.21/die_3.21_Ubuntu_22.04_amd64.deb sudo apt install ./die_3.21_Ubuntu_22.04_amd64.deb - Install ClamAV Antivirus engine
sudo apt install -y clamav clamav-daemon sudo systemctl stop clamav-freshclam sudo freshclam sudo systemctl start clamav-freshclam sudo systemctl enable clamav-freshclam sudo systemctl start clamav-daemon sudo systemctl enable clamav-daemon - Create the VM
It’s highly recommended to import an already installed windows qcow2 image and import it as a vm disk and start the vm, I have already prepared a qcow2 windows image installed using Windows 10 LSTC IOT iso as it’s not so bloated and minimal resource usage, And make sure to do the following
- Disable windows defender completely
- Disable UAC
- Disable windows updates
- Create static IP with the range of your already identified range in virtual network above
- Install common applications to make the VM resemble a real user environment
cd /opt/CAPEv2
mkdir disks # Transfer your QEMU disks here
- I have used the following XML for my sandbox (win10-ltsc-vm.xml)
<domain type='kvm'>
  <name>cuckoo1</name>
  <uuid>!PUT YOUR UUID HERE!</uuid>
  <metadata>
    <libosinfo:libosinfo xmlns:libosinfo="http://libosinfo.org/xmlns/libvirt/domain/1.0">
      <libosinfo:os id="http://microsoft.com/win/10"/>
    </libosinfo:libosinfo>
  </metadata>
  <memory unit='KiB'>2097152</memory> <!-- 2GB Memory -->
  <currentMemory unit='KiB'>2097152</currentMemory> <!-- 2GB Memory -->
  <vcpu placement='static'>4</vcpu> <!-- 4 CPUs -->
  <resource>
    <partition>/machine</partition>
  </resource>
  <os>
    <type arch='x86_64' machine='pc-i440fx-6.2'>hvm</type>
    <boot dev='hd'/>
  </os>
  <features>
    <acpi/>
    <apic/>
    <hyperv mode='custom'>
      <relaxed state='on'/>
      <vapic state='on'/>
      <spinlocks state='on' retries='8191'/>
      <vpindex state='on'/>
      <runtime state='on'/>
      <synic state='on'/>
      <frequencies state='on'/>
      <tlbflush state='on'/>
      <ipi state='on'/>
      <evmcs state='on'/>
      <avic state='on'/>
    </hyperv>
  </features>
  <cpu mode='host-passthrough' check='none' migratable='on'>
    <topology sockets='1' dies='1' clusters='1' cores='4' threads='1'/>
  </cpu>
  <clock offset='localtime'>
    <timer name='rtc' tickpolicy='catchup'/>
    <timer name='pit' tickpolicy='delay'/>
    <timer name='hpet' present='no'/>
  </clock>
  <on_poweroff>destroy</on_poweroff>
  <on_reboot>restart</on_reboot>
  <on_crash>destroy</on_crash>
  <devices>
    <emulator>/usr/bin/qemu-system-x86_64</emulator>
    <disk type='file' device='disk'>
      <driver name='qemu' type='qcow2'/>
      <source file='/opt/CAPEv2/disks/Win10-Enterprise-IOT-LSTC.qcow2'/> <!-- Path of the QCOW2 windows image -->
      <backingStore/>
      <target dev='hda' bus='ide'/>
      <address type='drive' controller='0' bus='0' target='0' unit='0'/>
    </disk>
    <controller type='usb' index='0' model='ich9-ehci1'>
      <address type='pci' domain='0x0000' bus='0x00' slot='0x05' function='0x7'/>
    </controller>
    <controller type='usb' index='0' model='ich9-uhci1'>
      <master startport='0'/>
      <address type='pci' domain='0x0000' bus='0x00' slot='0x05' function='0x0' multifunction='on'/>
    </controller>
    <controller type='usb' index='0' model='ich9-uhci2'>
      <master startport='2'/>
      <address type='pci' domain='0x0000' bus='0x00' slot='0x05' function='0x1'/>
    </controller>
    <controller type='usb' index='0' model='ich9-uhci3'>
      <master startport='4'/>
      <address type='pci' domain='0x0000' bus='0x00' slot='0x05' function='0x2'/>
    </controller>
    <controller type='pci' index='0' model='pci-root'/>
    <controller type='ide' index='0'>
      <address type='pci' domain='0x0000' bus='0x00' slot='0x01' function='0x1'/>
    </controller>
    <controller type='virtio-serial' index='0'>
      <address type='pci' domain='0x0000' bus='0x00' slot='0x06' function='0x0'/>
    </controller>
    <interface type='network'>
      <mac address='52:54:00:89:0c:c4'/>
      <source network='default'/>
      <model type='e1000'/>
      <address type='pci' domain='0x0000' bus='0x00' slot='0x03' function='0x0'/>
    </interface>
    <serial type='pty'>
      <target type='isa-serial' port='0'>
        <model name='isa-serial'/>
      </target>
    </serial>
    <console type='pty'>
      <target type='serial' port='0'/>
    </console>
    <input type='tablet' bus='usb'>
      <address type='usb' bus='0' port='1'/>
    </input>
    <input type='mouse' bus='ps2'/>
    <input type='keyboard' bus='ps2'/>
    <graphics type='vnc' port='-1' autoport='yes' listen='0.0.0.0'>
      <listen type='address' address='0.0.0.0'/>
    </graphics>
    <sound model='ich6'>
      <address type='pci' domain='0x0000' bus='0x00' slot='0x04' function='0x0'/>
    </sound>
    <audio id='1' type='none'/>
    <video>
      <model type='qxl' ram='65536' vram='65536' vgamem='16384' heads='1' primary='yes'/>
      <address type='pci' domain='0x0000' bus='0x00' slot='0x02' function='0x0'/>
    </video>
    <memballoon model='virtio'>
      <stats period='5'/>
      <address type='pci' domain='0x0000' bus='0x00' slot='0x07' function='0x0'/>
    </memballoon>
  </devices>
</domain>
- Define the created XML file for the sandbox and start it
virsh define win10-ltsc-vm.xml virsh start --domain cuckoo1 - Guacamole install to access sandbox via CAPE web gui
sudo ./installer/cape2.sh guacamole - Check if guacamole services are running
systemctl status guacd.service systemctl status guac-web.service - Install nginx
sudo apt install nginx sudo systemctl enable nginx - Create the Nginx configuration file for CAPE web gui and guacamole
sudo vim /etc/nginx/sites-available/cape.conf
server {
    listen 80 default_server;
    listen [::]:80 default_server;

    server_name <YOUR HOST IP>;

    client_max_body_size 1G;

    # Serve static assets directly (fixes 404 on CSS/JS files)
    location /static/ {
        alias /opt/CAPEv2/web/static/;
        expires 30d;
        add_header Cache-Control "public, no-transform";
    }

    # Route Guacamole WebSocket connections to guac-web (ASGI on port 8008)
    location /guac/ {
        proxy_pass http://127.0.0.1:8008;
        proxy_http_version 1.1;
        proxy_set_header Upgrade $http_upgrade;
        proxy_set_header Connection "Upgrade";
        proxy_set_header Host $host;
        proxy_set_header X-Real-IP $remote_addr;
        proxy_set_header X-Forwarded-For $proxy_add_x_forwarded_for;
        proxy_read_timeout 86400;
    }

    # Route standard Web GUI requests to cape-web (WSGI on port 8000)
    location / {
        proxy_pass http://127.0.0.1:8000;
        proxy_set_header Host $host;
        proxy_set_header X-Real-IP $remote_addr;
        proxy_set_header X-Forwarded-For $proxy_add_x_forwarded_for;
        proxy_set_header X-Forwarded-Proto $scheme;
    }
}
- Check the configuration and start nginx
sudo ln -s /etc/nginx/sites-available/cape.conf /etc/nginx/sites-enabled/
sudo rm /etc/nginx/sites-enabled/default
sudo nginx -t # if all ok
sudo systemctl restart nginx
Install CAPE agent to the sandbox
-
Install python 3.10.6 (32-bit) https://www.python.org/ftp/python/3.10.6/python-3.10.6.exe
- Run the following commands after installing of python is finished
python -m pip install --upgrade pip python -m pip install Pillow - On ubuntu host
cd /opt/CAPEv2/agent/ python3 -m http.server --bind 10.0.117.1 9000 - On the sandbox open powershell
curl -O beef.pyw http://10.0.117.1:9000/agent.py -
move the
beef.pywagent toC:\ProgramData\Microsoft\Windows\Start Menu\Programs\StartUp -
create task scedular fo it if required
- After finishing, Take a snapshot for the current status
virsh snapshot-create-as --domain cuckoo1 --name clean-shot --description "Clean Snapshot" # as cape user - Test the execution of CAPE within the virtual env of poetry
/etc/poetry/bin/poetry run python3 cuckoo.py - Start the service of cape
sudo systemctl enable cape
sudo systemctl start cape
sudo systemctl restart cape-processor.service
sudo systemctl restart cape-rooter.service
sudo systemctl restart cape-web.service
sudo systemctl restart suricata.service
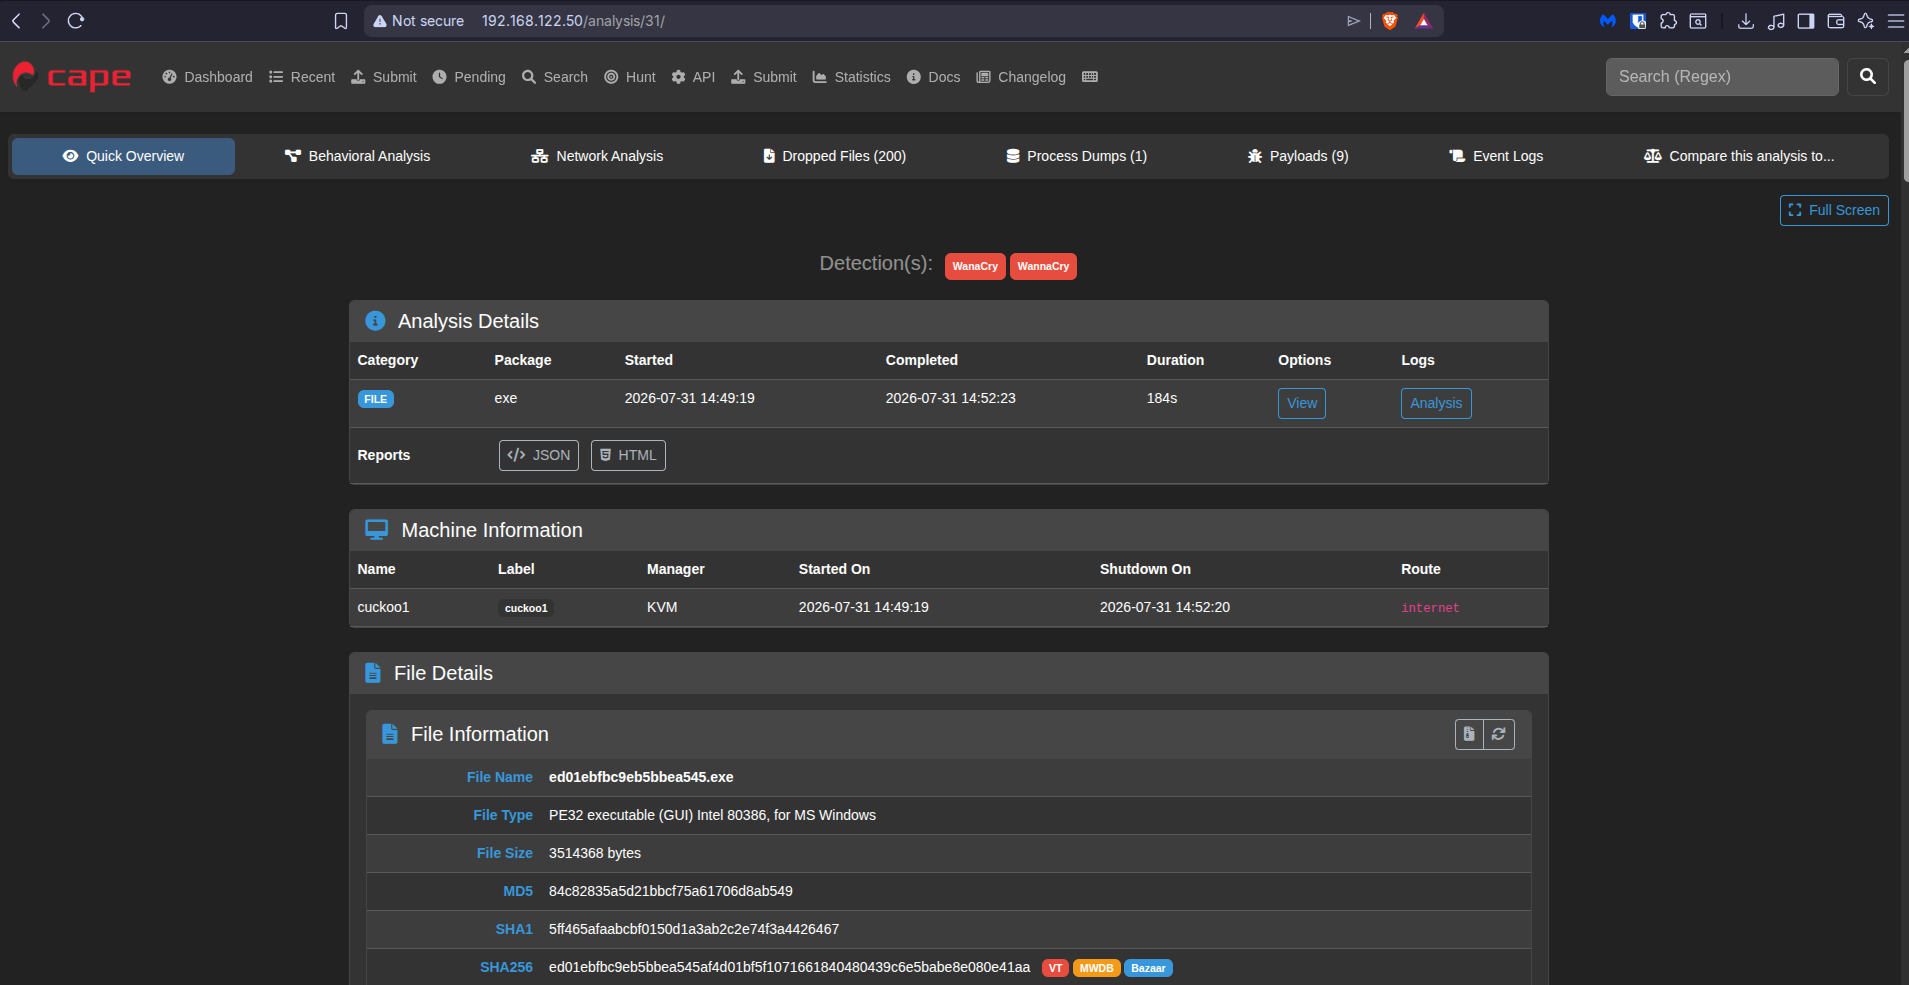
- Optional: Install all available signatures from CAPE community repository
python3 utils/community.py --signatures --force
